Brief Introduction #
Eager to get started? So are we. You can set up your marketplace with MultiVendorX in less than five minutes with our very helpful MultiVendorX Admin Setup Wizard. Or, you can configure more advanced features by going to MultiVendorX settings submenu. So without further ado let’s get started on the setup process.
MultiVendorX Admin Setup Wizard Guide #
MultiVendorX Admin Setup Wizard starts running the second, you activate the MultiVendorX plugin. It helps you go through some very basic options needed to set up a marketplace. So let’s jump in and see how the Admin setup wizard works.
- The first page of the Setup Wizard presents to you a welcome message and gives you the option of either continuing with the wizard by clicking Let’s go! or skipping by selecting Not right now
- The second page of the wizard will ask you to set the Store URL. This is the URL (web address) that customers browsing your website would have access to. By referencing the store url customers get to operations provided by your website.
- Next thing to do is to select the SPMV or Single Product Multiple Vendor option which basically means that the same product could be sold by multiple vendors. For example, a Company X Phone can be sold by vendor A, vendor B and Vendor C. So, in other words even if Vendor A sells CompanyX’s Phone Vendor B or Vendor C can sell it as well. But with the SPMV feature Vendor B would be able to sell CompanyX’s Phone like Vendor A at a different price with different shipping rates.
- The third page lets you configure the commission details by presenting you with certain options.
- You can choose how to share the commission between your vendor and yourself by selecting either of these options: Admin Fees or Vendor’s commissions.
- You can choose how the commission is going to be calculated by selecting the commission type
- Based on the commission type option selected by you the commission amount would need to be added
- The fourth page presents you with payment options. Here, a list will be presented to you from which you will have to choose payment methods which you would use to pay vendors. Next, you will get options regarding when you want to pay your vendors i.e daily, weekly, monthly etc. There will be a third option asking for your permission to let vendors withdraw their commissions by request
- The fifth page displays a list that lets your vendors have some product handling capabilities. This screen will ask you to make decisions regarding the capabilities you would like your vendors to have.
- Submit Products: By ticking this you are permitting the vendor to add and upload a product that will await your approval, before being published.
- Publish Products: By enabling this option you can let your vendors directly publish their products without waiting for your approval
- Edit Published Products: By marking this option you can let your vendors edit the products once it has already been published.
- Submit Coupons: On checking this, you are providing the vendor with the permission to add a coupon that will await your approval, before being published and applied on products.
- Publish Coupons: Marking this as checked, will allow your vendors to directly upload and publish the coupon without waiting for your confirmation.
- Edit Published Coupons: Enabling this ensures your vendors can edit the coupons once it has already been published.
- Upload Media Files: Enabling this option will let vendors upload media files like pictures, ebooks, gifs, live interviews or lessons and sell as downloadable or virtual products.
- Once all these options are configured you are ready to start your marketplace. You can either select the Return to WordPress Dashboard link or choose to create your vendor’s registration form which will transport you to the vendor’s registration form page.
Manually Configure Admin Setup Wizard #
Assuming, you reinstall our plugin, the automatic admin setup wizard may not appear. In which case you carry out the following steps –
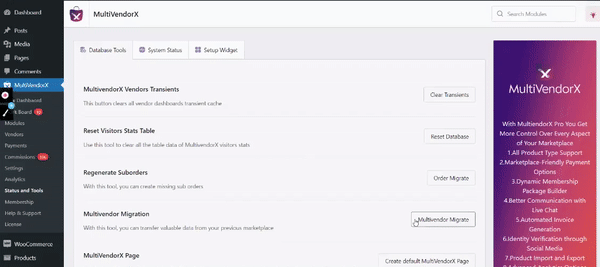
- Go to “Status & Tools” option available in the MultiVendorX menu
- Then navigate to Setup Wizard tab and make the required changes.
We hope this document was helpful in understanding the setup wizard. In case of any difficulties, our quick support will definitely help you in the right direction… that’s a word you can trust.


Leave a Reply
You must be logged in to post a comment.