


Brief Introduction #
An effective coupon system is a powerful way to attract new shoppers and keep existing customers engaged. By giving store owners the ability to create and manage their own coupons, you empower them to promote new product lines, reward loyal buyers, and boost sales. With MultiVendorX’s Coupon Management, vendors can easily create, edit, and track their coupons, all from their dashboard, making promotions simple and efficient.
Coupon Management Setup #
Most coupon management settings revolve around deciding what level of control you want to give your vendors so they can design effective and engaging coupons. Since coupon management is part of the core configuration, you’ll find dedicated settings to manage these options. Let’s explore them step by step.
Setting Coupon Management Capabilities #
To allow vendors to create and manage their own coupons:
- Go to Admin Dashboard → MultiVendorX → Settings
- Open the Marketplace tab and select User Capabilities
- Scroll to Coupon Management and enable the options you want vendors to use:
- Manage Coupons – Gives vendors access to the coupon feature
- Edit Coupons – Allows vendors to modify their existing coupons
- View Coupons – Lets vendors see all their coupons
- Delete Coupons – Allows vendors to remove their coupons

Once you choose the permissions, vendors will be able to handle their coupons directly from their dashboard.
Coupon Payment Management #
Once store owners are given the ability to create their own coupons, it’s important to define how the discount cost will be shared. This is managed through the Coupon & Discount settings.
To access the settings, you will have to navigate to MultiVendorX → Settings → Finance → Coupons & Distance
Configuring Coupon Disbursement #
- Who will bear the Coupon Cost
This option lets the admin decide who absorbs the coupon discount on vendor products.
- Store (Store owner bears the cost): Commission is calculated after the coupon is applied.
- Example: Product price = $100, coupon = 20% → Final price = $80.
- Store commission = 80% of $80 = $64.
- Example: Product price = $100, coupon = 20% → Final price = $80.
- Admin (Admin bears the cost): Commission is calculated on the original product price, and the admin covers the discount.
- Example: Product price = $100, coupon = 20% → Final price = $80.
- Store commission = 80% of $100 = $80.
- Example: Product price = $100, coupon = 20% → Final price = $80.
- Store (Store owner bears the cost): Commission is calculated after the coupon is applied.
- Exclude Admin-Created Coupons from Store Commission
This setting only applies if the first option is enabled. When turned on, any coupons created by the admin will have their discount cost deducted from the admin’s commission, not the vendor’s.

Once these two settings are configured, coupon cost distribution will be handled automatically by the system.
Create Coupons #
Now that your share of coupon management is complete, let’s see how store owners can add and manage coupons from their dashboards.
Adding a New Coupon #
- Go to your Store Dashboard → Coupons
- Click Add Coupon
- On the Coupon Details page, fill in:
- Coupon Code – create your own or auto-generate one
- Description (optional) – add a short note about the coupon
- Coupon Code – create your own or auto-generate one

Coupon Data Metabox #
This section contains all the coupon configuration options, organized into three tabs:
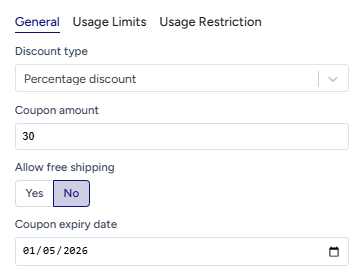
1. General Tab #
Basic coupon details are configured here:
- Discount Type – Choose how the discount will be calculated (fixed or percentage).
- Coupon Amount – The numerical value of the discount to be applied.
- Allow Free Shipping – If enabled, customers can use free shipping (only applicable if free shipping is configured by the admin).
- Coupon Expiry Date – Set the date after which the coupon is no longer valid.
2. Usage Restriction Tab #
This tab defines the conditions for using the coupon:
- Minimum Spend – The minimum purchase amount required to use the coupon.
- Maximum Spend – The maximum purchase amount allowed for coupon usage.
- Individual Use Only – Prevents the coupon from being combined with others.
- Exclude Sale Items – Disables coupon use on already discounted products.
- Products – Select the specific products the coupon applies to.
- Exclude Products – Select products excluded from the coupon.
- Product Categories – Categories where the coupon will apply.
- Exclude Categories – Categories where the coupon won’t apply.
- Allowed Emails – Restrict coupon usage to specific customer email addresses.

3. Usage Limitation Tab #
This tab specifies the limits for coupon usage:
- Usage Limit Per Coupon – The total number of times the coupon can be used.
- Limit Usage to X Items – Restricts the number of items the coupon applies to.
- Usage Limit Per User – Defines how many times an individual customer can use the coupon.

Once all the details are filled in, store owners can either publish the coupon directly for customer use or submit it for admin review (if required).
Coupon List #
The Coupon List helps store owners manage all coupons they’ve created. It provides an organized record, allowing them to edit, review, or reuse past coupons as references. The list includes the following columns:
- Coupon(s): The title given to the coupon.
- Coupon Type: The type of discount offered (e.g., fixed product, fixed cart, or percentage).
- Coupon Amount: The value of the discount.
- Usage / Limit: The total number of times the coupon can be used.
- Expiry Date: The last valid date for the coupon.
Actions: Store owners can edit existing coupons or view them on the shop page.


