
")


- How payments flow in your marketplace
- Configuration of the Disbursement flow
- Step 1: Eligible Order Statuses for Commission Payout (Decide when money goes to the store wallet)
- Step 2: Lock Period (Add a safety delay before money is usable)
- What it does:
- Step 3: Minimum Payout Threshold (After waiting, money becomes usable)
- Step 4: Minimum Wallet Reserve (Control how much can be paid)
- 5. Payout Frequency
- 7. Free Withdrawals and Fees
- Payout Workflow Summary
Managing the flow of funds – from receiving customer payments to paying stores- can often be a time-consuming process. While the steps themselves can’t always be shortened, the right tools can make the entire journey far easier to handle.
This guide helps you set up when and how stores receive their money.
👉 Important idea to remember:
Orders don’t go directly to payout.
They first move into the store wallet – then get paid.
Setting up how stores get paid in your marketplace doesn’t have to be complicated.
This guide will help you understand:
- When stores earn money
- When that money becomes available
- When and how it gets paid
By the end, you’ll know exactly how your payout system works – without any confusion.
How payments flow in your marketplace #
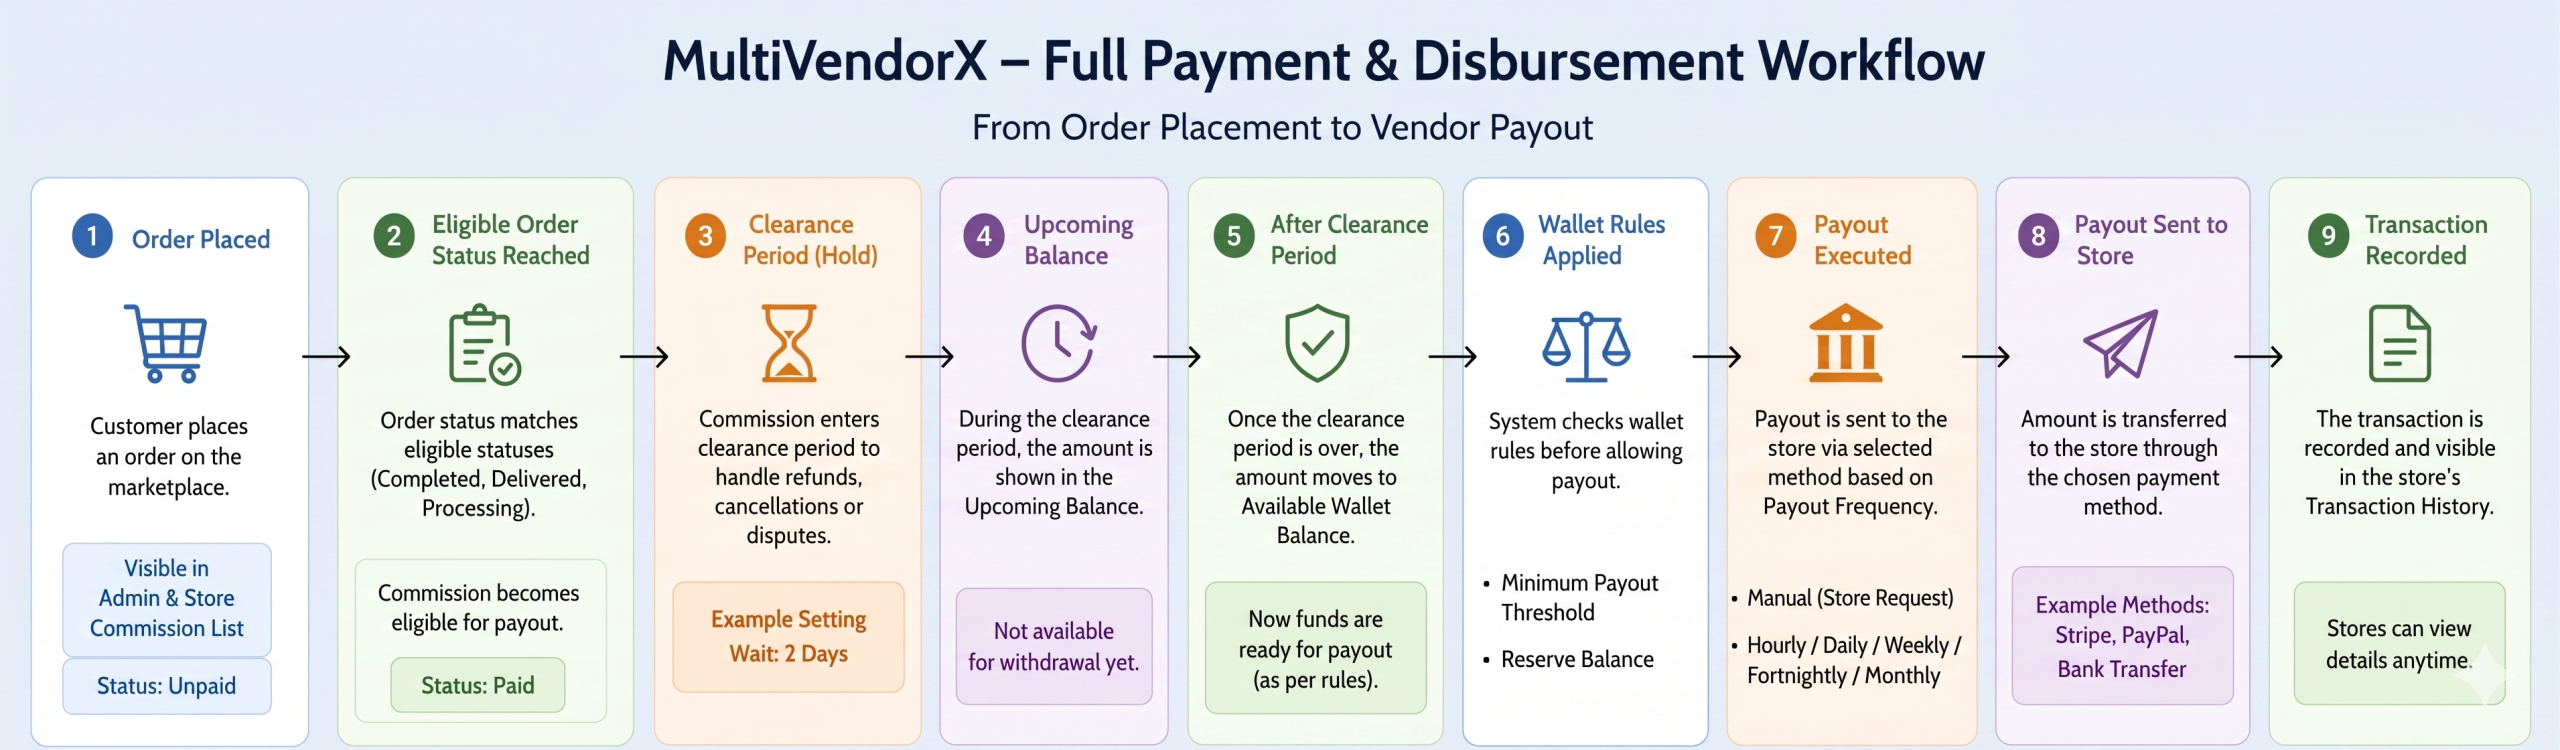
Before we jump into settings, here’s the simple journey of money:
👉 Order placed → Earnings created → Waiting period → Wallet → Paid to store
Each step exists to keep your marketplace safe and organized.
Configuration of the Disbursement flow #
The Disbursement Flow in MultiVendorX allows you to fully customize how commissions and payouts are handled in your marketplace. Below are the available settings and how each of them works:

Step 1: Eligible Order Statuses for Commission Payout (Decide when money goes to the store wallet) #
This setting defines which order statuses will trigger a commission payout to the store owner. Only orders with the selected statuses are considered eligible for payouts.
Available options:
- Completed – Orders marked as completed are eligible.
- Delivered – Orders marked as delivered will qualify.
- Shipped – Orders that have been shipped.
- Processing – Orders that are still being processed.
Workflow:
When an order reaches one of the eligible statuses, the system calculates the store’s commission and adds it to the payout queue according to your payout settings.
👉 This setting decides:
“At which order status should the amount be added to the store wallet?”
Step 2: Lock Period (Add a safety delay before money is usable) #
The Lock Period is a safety buffer that keeps payouts on hold. This is useful for handling refunds, cancellations, or disputes before funds are released.
- Wait: Specify the number of days to hold commissions before they become eligible for payout.
- Example: If the lock period is 8 days, commissions are only released 8 days after the order reaches the eligible status.
What it does: #
Even after money is added to wallet:
👉 It is NOT immediately availableIt goes into:
👉 Upcoming Balance
Step 3: Minimum Payout Threshold (After waiting, money becomes usable) #
This option sets the minimum amount a store must accumulate before payouts are processed.
- Example: If the minimum payout threshold is $50, a store with $40 in earned commission will not receive a payout until the balance reaches $50.
After clearance period:
👉 Money moves to:
Available Wallet Balance
Step 4: Minimum Wallet Reserve (Control how much can be paid) #
Ensure a fixed reserve balance always remains in the store’s wallet.
- How it works:
This amount cannot be withdrawn by vendors, serving as a safety reserve.- Example: If the reserve is set to $10, vendors will always maintain at least $10 in their wallet balance, even after a payout.
👉 Minimum payout threshold : Store must have at least this amount to get paid
👉 Minimum wallet reserve : This amount will always stay locked in wallet

5. Payout Frequency #
Admins can decide how often commissions are released to stores. Options include:
- Manual – Stores handle withdrawals themselves from their dashboard. Means, the store owner must initiate withdrawals from their dashboard.
- Hourly – Commissions are released every hour automatically.
If the payout frequency is set to Hourly, you can define the hour for the day for commission payout- Daily – Commissions are released once per day.
- If the payout frequency is set to Daily, you can define thetime for the daily commission payout.
- Weekly – Commissions are released once per week.
- If the payout frequency is set to Weekly, you can define the day and time for the weekly commission payout.
- On: Select a day for the disbursement
- At: Enter a time for the disbursement
- Once per week, commissions will be automatically released to stores on the selected day and time.
- Fortnightly – Commissions are released every two weeks.
- If the payout frequency is set to Fortnightly , you can define the Fortnightly disbursement related settings:
- Frequency: Every two weeks
- Day Selection: Choose the first and second payout days (e.g., 1st and 2nd Friday)
- Time: Specify the time for the payouts
- Daily – Commissions are released once per day.
Description: Commissions will be automatically disbursed to stores every fortnight on the selected days and time. This ensures regular payouts while maintaining a consistent schedule for store owners.
- Monthly – Commissions are released once a month, based on the configured date and time.
If the payout frequency is set to Monthly, you can define:
- Day of the month – Choose the date for payout (defaults to the last day of the month if not set).
- Time of day – Specify the exact time when commissions should be released.
7. Free Withdrawals and Fees #
This setting controls how many times stores can withdraw their earnings without incurring a fee. You can set limits based on your business model to balance flexibility and administrative costs.
Payout Workflow Summary #
- The customer places an order on the marketplace.
- Order reaches an eligible status as configured in settings.
- The system calculates the store commission.
- Payouts follow the commission settlement method:
- Instant – Released immediately.
- Scheduled/Delayed – Held until lock period or scheduled payout time.
- Instant – Released immediately.
- The minimum payout threshold is checked before releasing funds.
- Commissions are released manually by the store or automatically based on the chosen frequency.
- For monthly payouts, the system follows the configured date and time.
- Free withdrawal limits are applied if configured.
Payment Process Explained #
Here’s a step-by-step overview of how payments work in MultiVendorX:
Step 1 – Customer Checkout
A customer selects a product and proceeds to the Checkout Page.
Step 2 – Billing Details
The customer enters their billing information. Based on the billing address, the system calculates and displays the shipping and tax amounts along with the product cost.
Step 3 – Payment Gateway Selection
After confirming the order, the customer selects a payment gateway. The payment is processed and transferred to the admin’s account.
Step 4 – Admin Overview
Once the order is created, the admin can view the product amount and their earnings from the sale under the Commission menu.
Step 5 – Managing Payment Details
By selecting the Transaction ID, the admin can view and manage detailed payment information for the order.
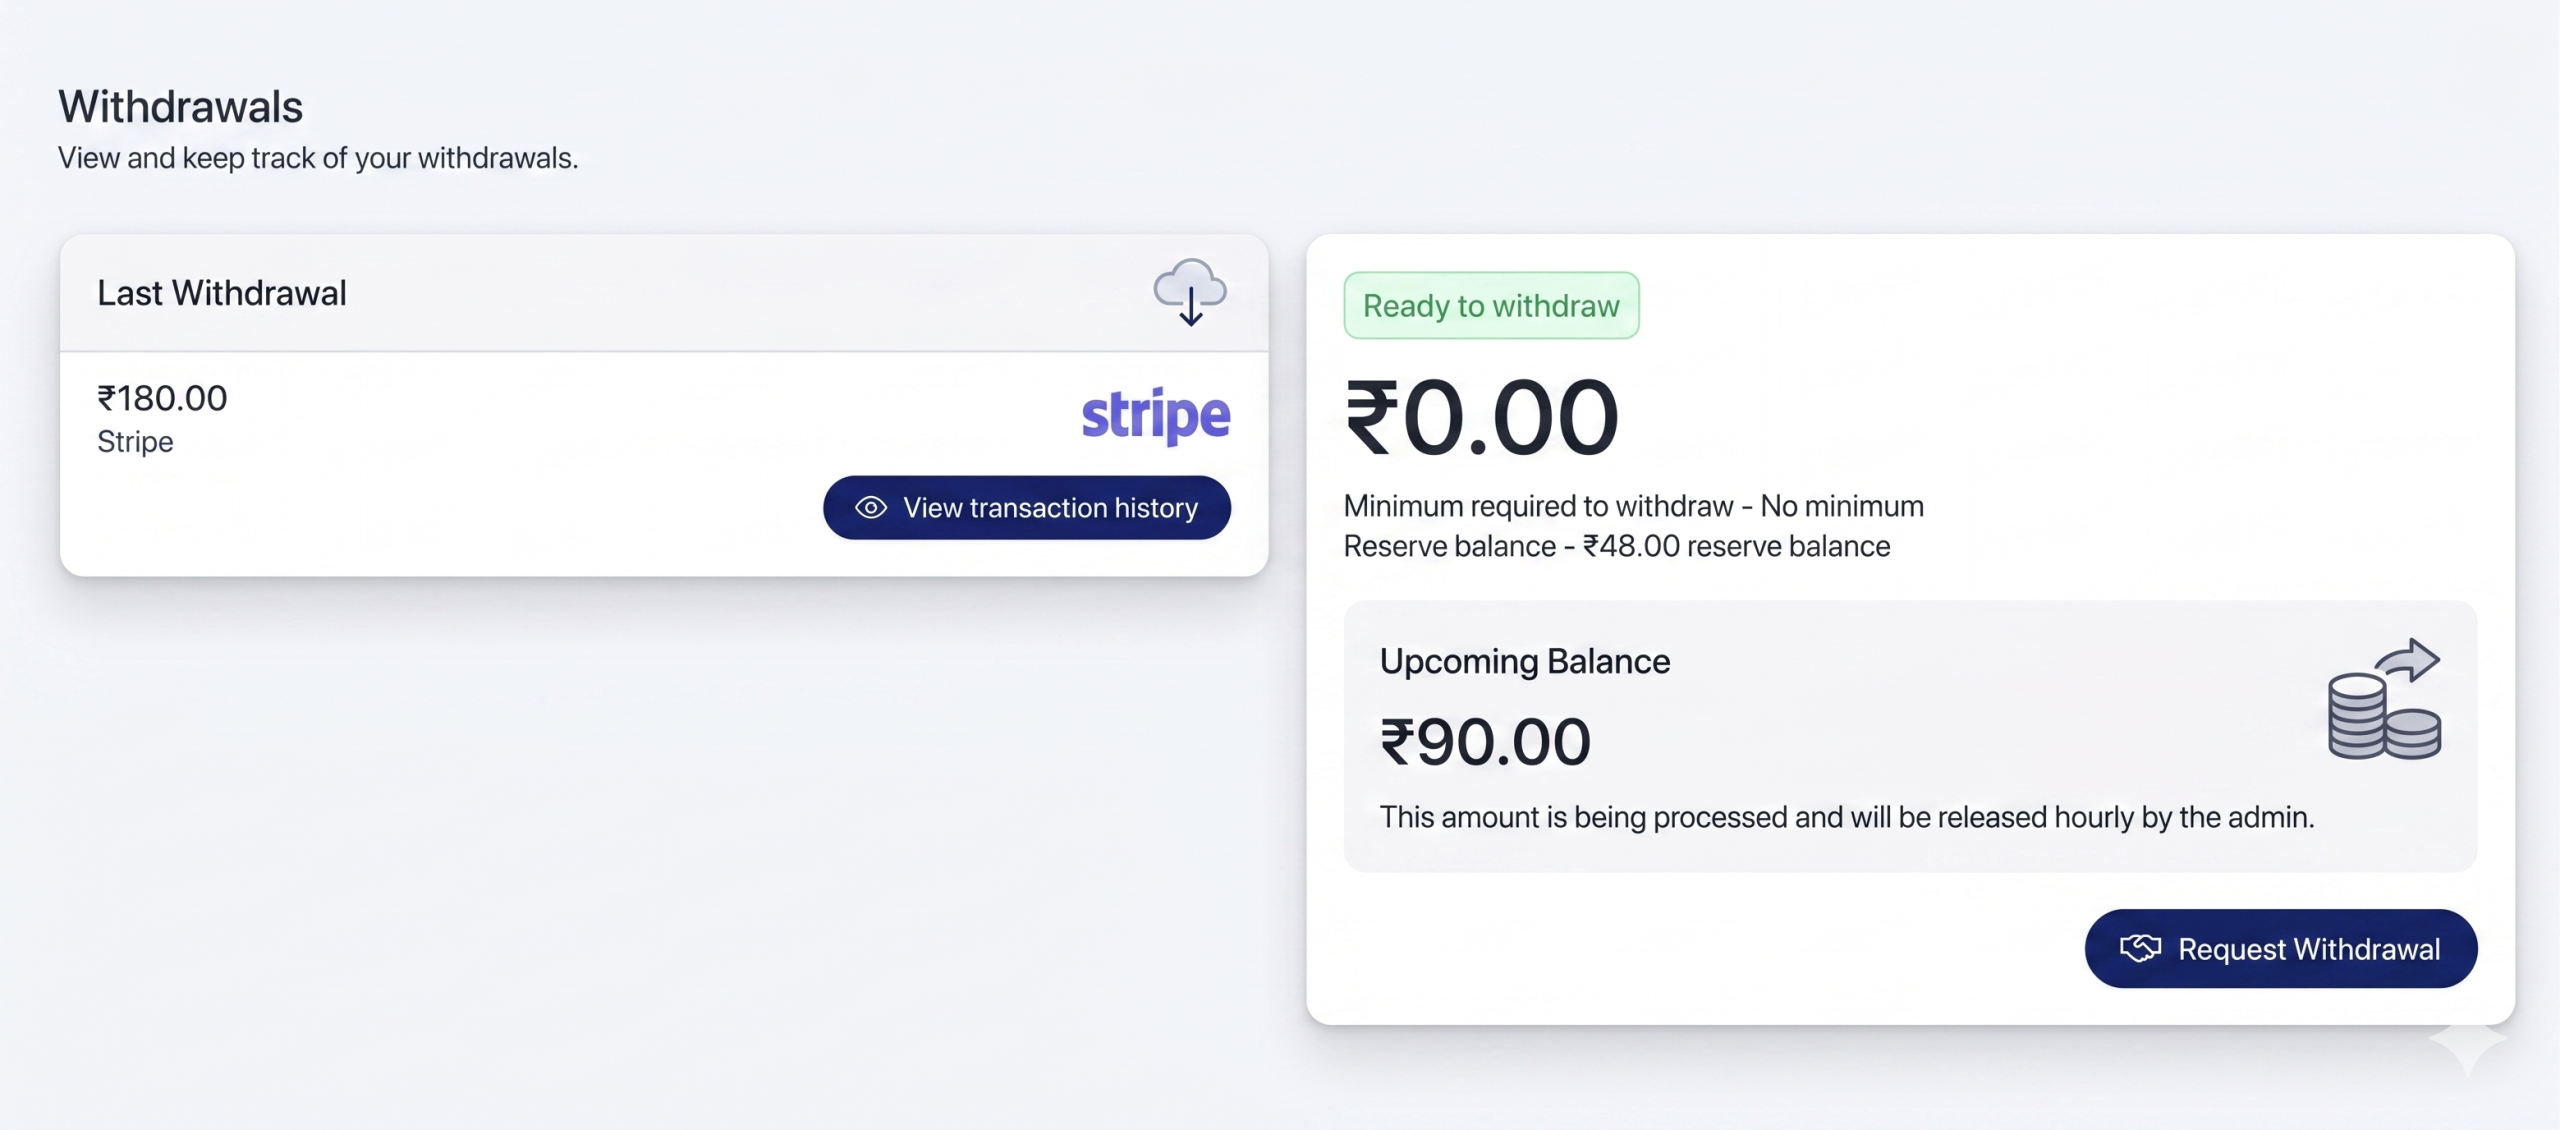
Step 6 – Store Banking Overview
Vendors can view their banking overview, provided the admin has enabled the Request Withdrawal option.
Step 7 – Admin Payment to Vendors
Once satisfied with the order, the admin can pay the vendor. Payments can be made via:
- Automatic methods: PayPal, PayPal MassPay, Stripe
- Manual methods: Direct bank transfer
Step 8 – Store Withdrawal Requests (Manual Payment)
If using a manual payment method, vendors can request their payment by clicking the Withdraw Request button.
Step 9 – Automatic Payments
For automatic payments, Store owners receive their earnings according to the disbursement schedule set by the admin.
Step 10 – Payment Gateway Charges (Automatic Payments)
When payments are disbursed automatically, applicable payment gateway charges will be deducted. Learn more about payment processing here.Step 11 – Store Payment History
After the payment process is complete, vendors can view their transactions by clicking the Transaction ID on the dashboard or in the History section under the Payment Dashboard menu.


