


Depending on your marketplace setup, taxes and additional fee deductions may also affect how earnings are distributed between the marketplace and the store.
Understanding these deductions is important because they directly affect:
- Marketplace earnings
- Store payouts
- Customer checkout totals
- Wallet balances
This document explains how taxes and fee deductions affect commission calculations in MultiVendorX.
Detailed setup guides for marketplace fees, gateway fees, and facilitator fees are covered in their separate documentation.
Understanding how deductions work #
Whenever an order is placed, MultiVendorX first calculates the marketplace commission.
After that, additional deductions or adjustments may be applied depending on your finance configuration.
Marketplace earning flow #
Customer places order
↓
Marketplace commission gets calculated
↓
Taxes and additional deductions get applied
↓
Final store earning is calculated
↓
Store earning moves to wallet
↓
Store receives payout
Different marketplaces use different deduction structures depending on their business model and operational requirements.
Understanding tax distribution #
Taxes are one of the most important parts of marketplace finance configuration.
MultiVendorX allows you to control how taxes are distributed between the marketplace and the store.
You can configure tax handling from:
Settings → Finance → Tax Distribution
The platform provides three tax distribution models:
- Marketplace share
- Store share
- Commission based tax
Each model changes how tax earnings are distributed after checkout.
Marketplace share #
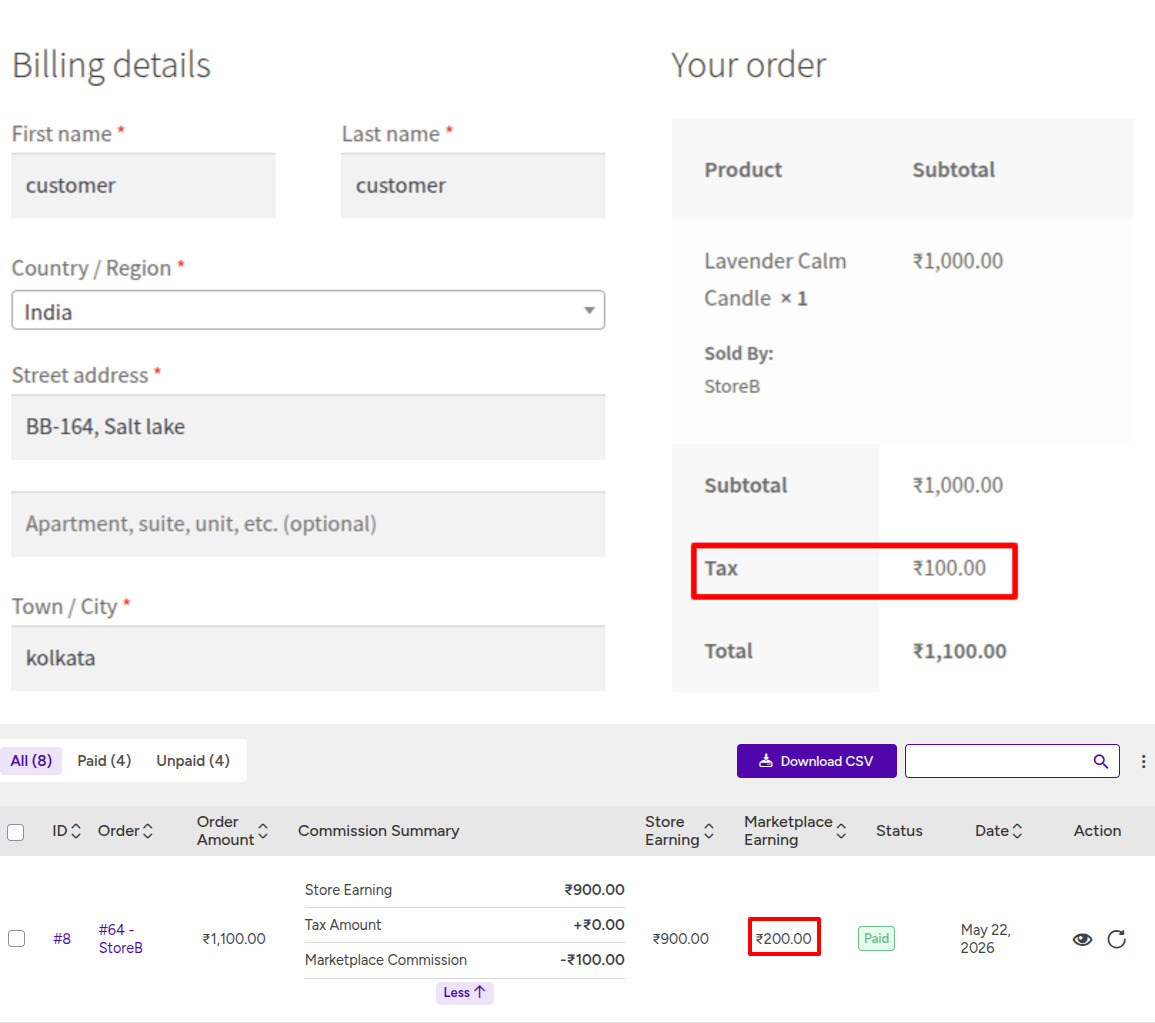
In this model, the marketplace keeps the collected tax amount.
The store receives only its earning after commission deduction.
This setup increases marketplace earnings because the marketplace also receives the tax collected during checkout.
Example
- Product price = $1,000
- Tax = $100
- Marketplace commission = 10%
Customer pays:
- $1,100 total
Marketplace receives:
- $100 commission
- $100 tax
Store receives:
- $900
This model is commonly used when the marketplace itself is responsible for tax handling.
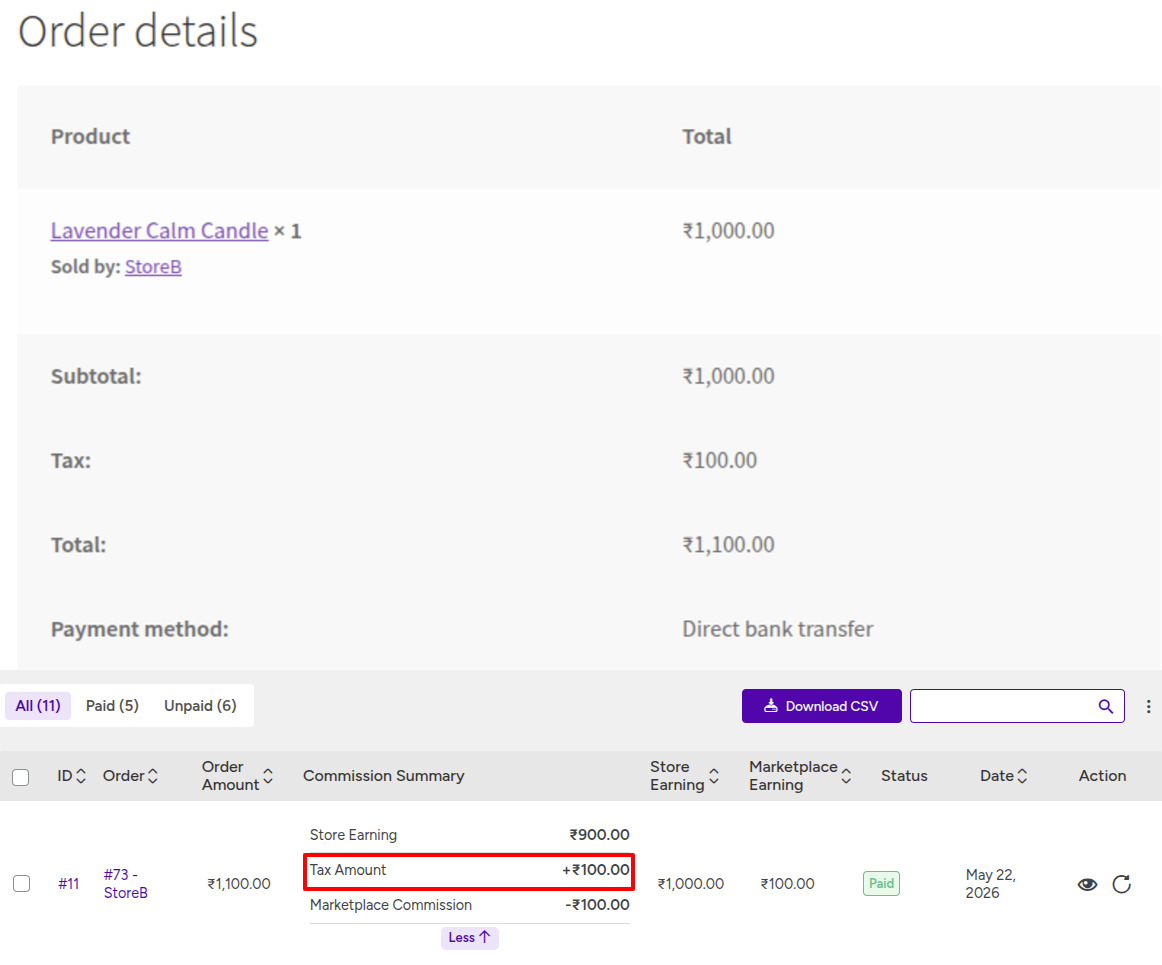
Store share #
In this model, the collected tax belongs to the store.
The marketplace keeps only its commission amount.
Example
- Product price = $1,000
- Tax = $100
- Marketplace commission = 10%
Customer pays:
- $1,100 total
Marketplace receives:
- $100 commission
Store receives:
- $900 earning
- $100 tax
Final store payout:
- $1,000
This model is commonly used when stores manage their own tax reporting.
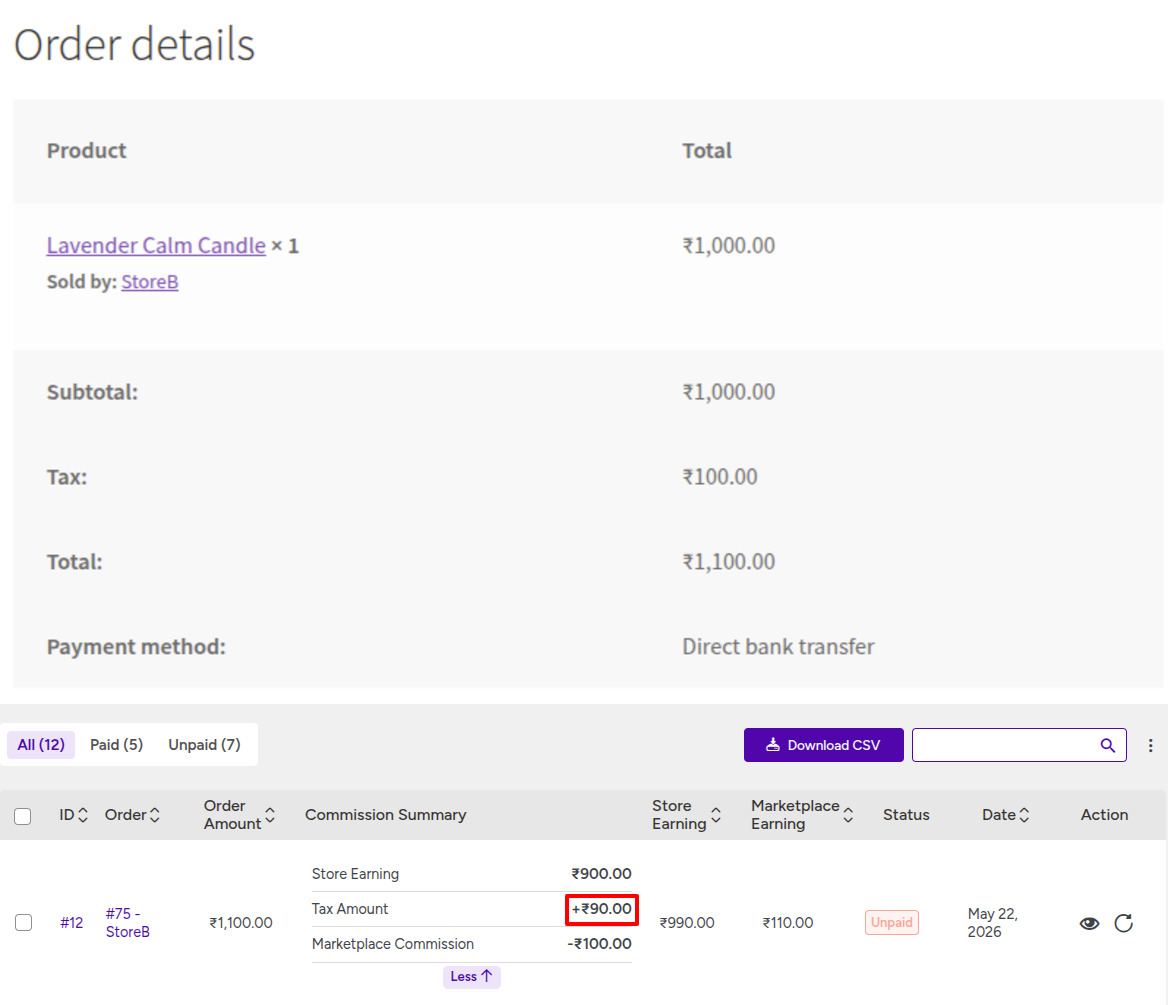
Commission based tax #
In this model, tax is distributed proportionally between marketplace and store earnings.
The marketplace receives tax only on its commission amount, while the remaining tax belongs to the store.
Example #
- Product price = $1,000
- Tax = $100
- Marketplace commission = 10%
Marketplace receives:
- $100 commission
- $10 tax share
Store receives:
- $900 earning
- $90 tax share
This creates a balanced tax distribution between the marketplace and the store.
Charging tax on shipping cost #
Some marketplaces also apply taxes to shipping charges.
MultiVendorX allows you to decide whether shipping costs should be taxable during checkout.
If enabled:
- Shipping charges become taxable
- Tax is added to shipping cost
If disabled:
- Shipping remains tax-free
This affects the final order total and changes how taxes are distributed between the marketplace and stores.
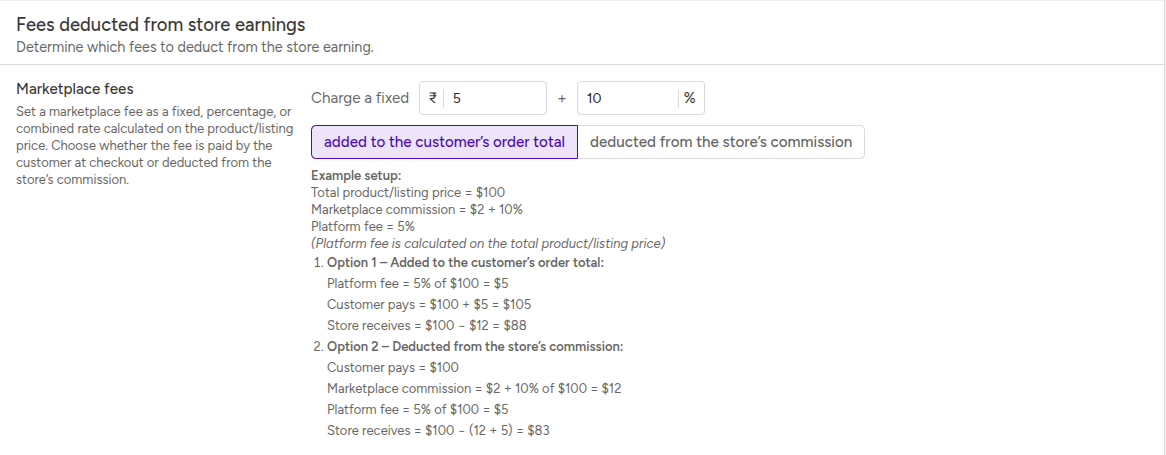
Understanding marketplace fees #
Marketplace fees are additional platform charges collected by the marketplace.
These fees are separate from the main marketplace commission and can either:
- Increase the customer checkout total
- Reduce the final store payout
This means marketplace fees directly affect the final earning distribution of an order.
Example #
- Product price = $1000
- Marketplace commission = 10%
- Marketplace fee = 5%
Depending on configuration:
- Customer may pay extra fees during checkout
- Or the fee may be deducted from the store earning
Detailed marketplace fee setup is covered in the separate marketplace fee documentation.
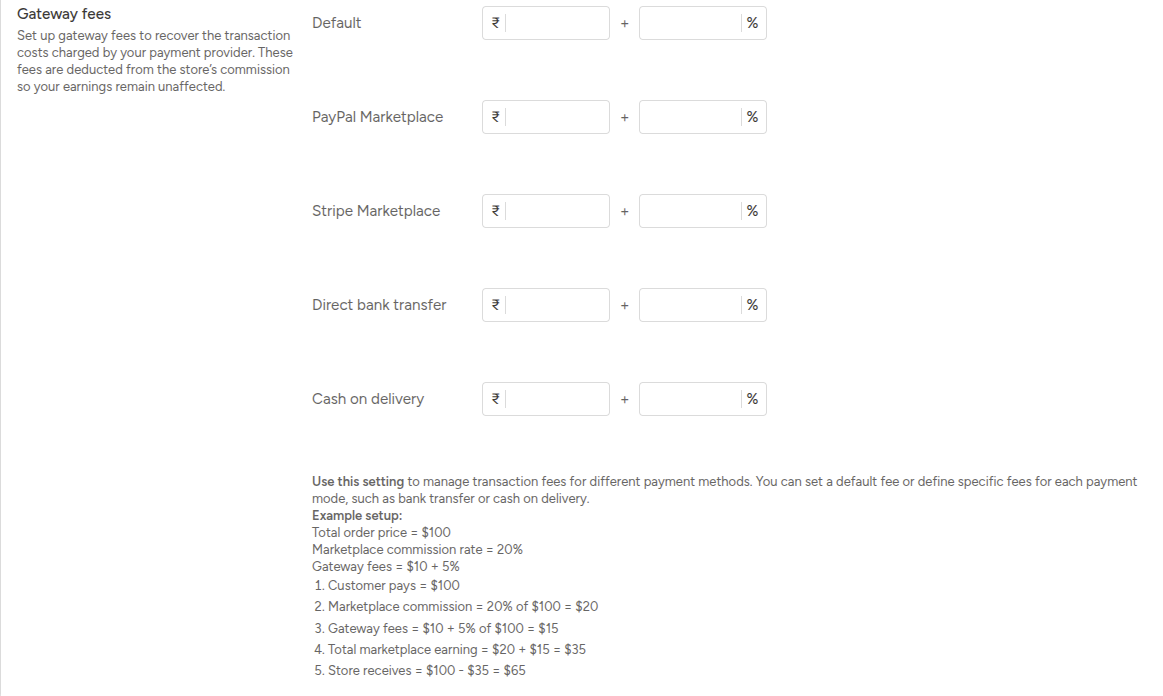
Understanding gateway fees #
Payment gateways such as Stripe or PayPal usually charge transaction processing fees.
MultiVendorX allows marketplaces to recover these charges using gateway fees.
Gateway fees are usually deducted from the store payout so marketplace earnings remain protected.
This means the final store earning becomes lower after gateway fee deduction.
Example #
- Product price = $100
- Marketplace commission = 20%
- Gateway fee applies
The gateway fee is deducted before the final payout reaches the store.
Detailed gateway fee configuration is covered in the separate gateway fee documentation.
Understanding facilitator fees #
Some marketplaces work with external facilitators, agencies, or service providers.
MultiVendorX allows facilitator fees to be deducted separately from store earnings.
These fees are calculated independently from marketplace commission and reduce the final store payout amount.
Example #
- Product price = $1,000
- Marketplace commission = 20%
- Facilitator fee applies
After commission deduction, facilitator fees are also deducted before the remaining amount reaches the store.
Detailed facilitator fee configuration is covered in the separate facilitator fee documentation.

How taxes and fees affect commission #
One of the most important things to understand is that commission is usually calculated first.
After that:
- Taxes may be distributed
- Additional fees may be added
- Gateway deductions may apply
- Facilitator charges may be deducted
This means the final store payout can become different from the original commission calculation.
Simple payout flow #
Order total
↓
Marketplace commission calculated
↓
Taxes distributed
↓
Additional fees deducted
↓
Final store earning generated
Understanding this flow helps marketplace owners understand why final payouts sometimes differ from expected commission values.
Recommended setup for new marketplaces #
If you are launching a new marketplace, it is best to keep deductions simple in the beginning.
Recommended beginner setup #
- Percentage-based commission
- Store share tax model
- Minimal additional fees
- Basic gateway fee recovery
This keeps payouts easier to understand for both marketplace admins and stores.
As your marketplace grows, you can gradually introduce:
- Advanced tax distribution
- Marketplace fees
- Facilitator fees
- Complex deduction structures
Final thoughts #
Taxes and fee deductions are an important part of marketplace finance management.
Once you understand:
- How taxes are distributed
- How deductions affect payouts
- How additional fees change final earnings
it becomes much easier to manage marketplace revenue and store payouts properly.
Keeping the deduction structure simple in the beginning helps reduce confusion for both admins and stores.
What’s next #
Now that you understand taxes and fee deductions, continue with:
Understanding store wallet and earning flow
In the next document, you will learn about:
Wallet balances
Pending earnings
Clearance periods
Minimum payout thresholds


