Brief Introduction #
Make your marketplace a hub of opportunities by creating membership packages that appeal to each vendor’s marketing needs. The Membership module lets you create fully customisable membership packs where you can restrict a vendor’s product capability, decide membership billing cycle and add a trial or free version of the package.
Requirements #
MultiVendorX
Features #
- Decide on different levels of membership plans – Add hierarchy to the membership packages created by you. This would allow vendors to upgrade and you the opportunity to make profits. Add payment modules to membership plans – Design membership packages by payment modules like a free, trial or paid module.
- Customise Membership Packages – Create vendor membership packages by controlling vendor access to the following modules
- Product – Decide on the number of products, the type of product and product capabilities a vendor can have, in the membership packages designed by you.
- Order – Decide on the amount of control a vendor can exert when managing his product
- Commissions – Add commission rate according to membership plans
- Payment – Mange what kind of payment gateway would be used by vendors according to their membership packages
- Shipping support – Decide whether to let vendor’s handle shipping on their own or not.
- Miscellaneous – Make allowances for setting up customer policies, customer support and other miscellaneous tasks like uploading median and so on, in the membership packages designed by you.
- Create a membership billing cycle – When deciding membership plans and packages, it is imperative to have a billing cycle that will let vendors renew or upgrade to better plans automatically.
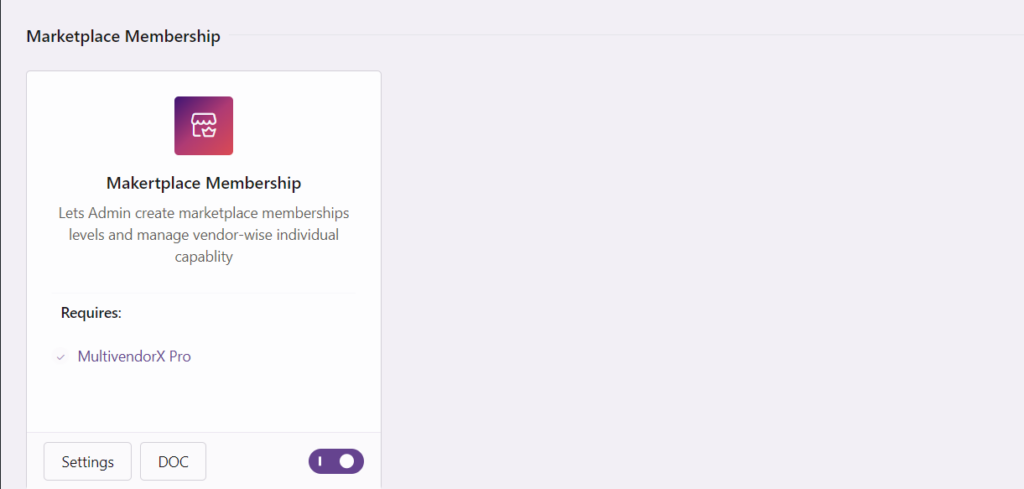
Now to enable Memberhsip module goto MultiVendorX >> Modules and simply activate this.
Create A Membership Package #
Now that the basic settings of the membership pack have been set by you, we can move on to learning how to create a membership pack.
To create a membership pack –
- Go to the Products and then select the Add New option
- On the Add New page, add the following details
- Add Title – You can add a title for your membership packs by giving it a heading, for example, Gold Pack/ Premium Pack etc
- Add Description – You can add a description for the package to give vendors a proper explanation of what the package consists.
- Customize Feature List – In the second meta box, you can add the list of features a vendor can avail of once he/she subscribes to the pack. For example, the gold pack would let vendors have features like product management, order management, reports, etc
- Set Product Price – This price is the base price, paid by the vendor. In order to make the plan a free plan, set the price as 0
- Membership tab – By configuring this section of the membership pack you can decide on the following settings –
- Category Limitation : In this section, you can set the limitation for the number of products a vendor can add to the site.
- Product Limitation : Set the number of products, vendor can add under that plan.
- Gallery Image Limitation : Set the number of images, vendor can add for that product.
- Enable featured product : Set whether vendors can mark their products as featured.
- Pack Validity : Admin can decide how long a vendor can be subscribed under this plan. For unlimited time, set the days as 0.
- Commission Type – Choosing a commission type will help you decide how you want to calculate your commissions.
- Vendor commission – You can set up a basic commission value for this package by adding a numerical value in this field
- Allowed Product Types : Set which type of products vendor can sell under that plan i.e. simple/variable etc
- Allowed Categories: Set which categories can be used by the vendor.
- Withdrawal Locking Period – By adding a numerical value in this field you can decide the minimum number of days required before vendors can withdraw their commission
- Miscellaneous: You can decide on the different types of capabilities you want your vendor to have.
- MultiVendorX Modules: You can decide which addon’s can be used by the vendor.
- Status After Grace: Once a plan will be expired, you can set the user role of that vendor.
- Hide Product after Grace: This option lets the admin hide all the product, if the grace
- Grace Period in days : You may provide a grace period to the vendors. Set the duration of that grace period.
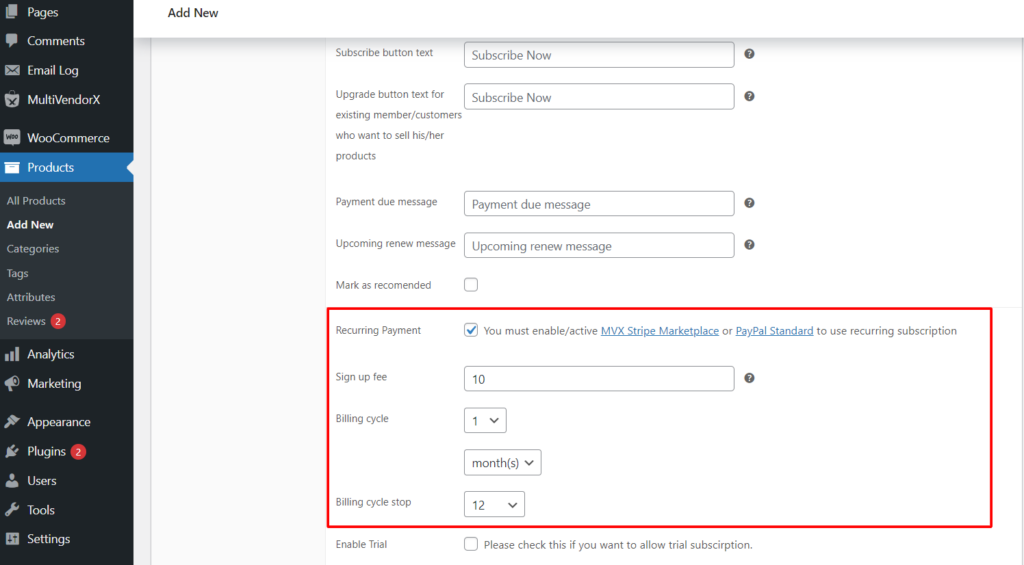
- Recurring : This option enables Recurring Subscription Payment. First, two will let you set the billing cycle for this subscription. In simpler words, this is “How long the subscription will be valid for before it is automatically renewed.” For example, if you set 3 months, it will mean the subscription will be valid for three months and then it will be automatically renewed.
- Trial Period : the admin can set the trial period for the subscriptions. Meaning that the vendors can vet the quality of the subscription during the free trial period. If the vendors think that the quality is not good then they can cancel buying the package.
In the example below, you can see we have set billing cycle for 1 month, which means the customer will be charged for 1 month, and the cycle will keep recurring 12 times. So this subscription pack will charge per month and will run for 12 months.
Manage Membership Messages #
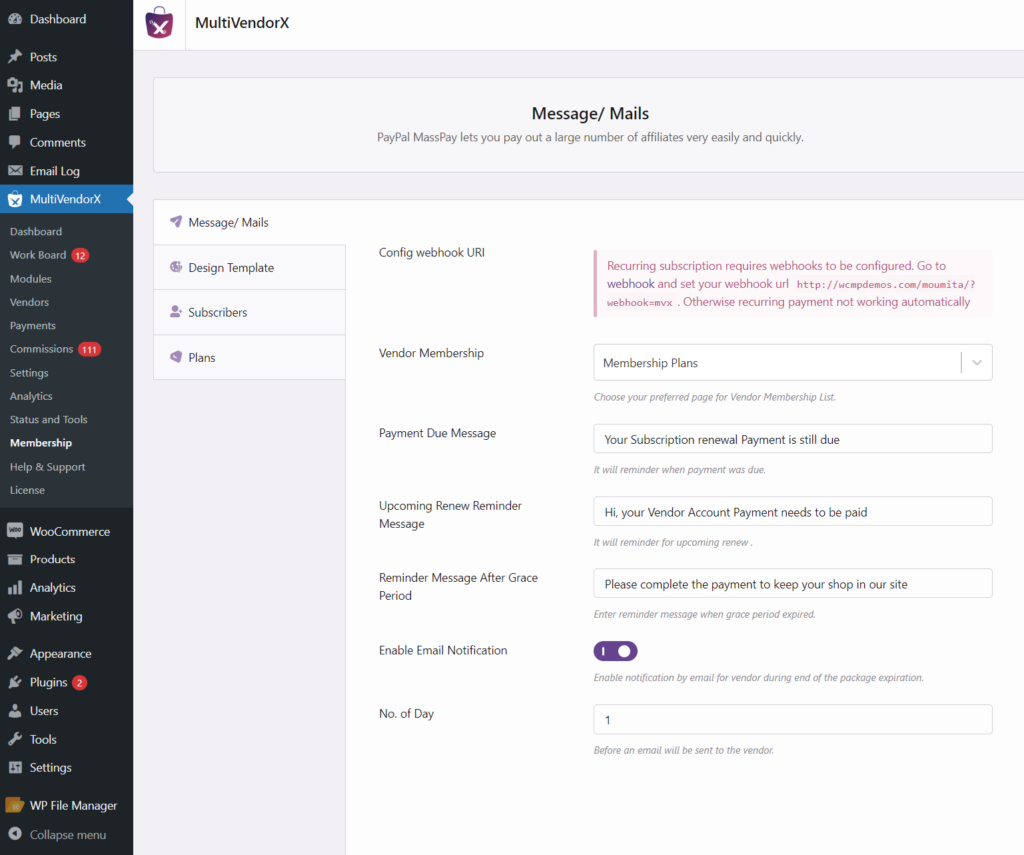
To keep your vendors involved, keeping them informed is one crucial step you cannot skip. This is where the membership messaging section comes in handy. Not only can you inform vendors.
You can write informative messages to new members by simply following these few steps –
- Go to Admin Dashboard and navigate to the MultiVendorX menu option. Now browse down to Membership
- Once the page opens, On the Message/Mails section page, you can write messages for the following sections –
- Paytime Due Message – This is a reminder message that vendors receive a few days before the membership plan expires
- Renew Reminder Message – Another reminder message that vendors receive reminding them to renew their plans
- Reminder Message After Grace Period – Sometimes vendors receive an extension on their renewal deadline. Once the extended period expires, vendors would receive a reminder message notifying them of the end of the grace period.
- Enable Email Notification – If you want to notify the vendors regarding their membership renewal, then enable this option.
- No. of Days : This option lets the administrator set when they should send the renewal notification to the vendors. I.e. if you set No. of days as 7, then the vendor will get the mail 7 days before the membership expiry.
Note: The message added in this section would apply to all membership packages. You can also add different messages for different membership packs by configuring the Vendor Message section of the membership pack.
Membership Payments Setup #
You can ensure how the vendors would pay for their membership plans by configuring the payment settings of the membership extension.
There are two types of subscription package :
- Recurring
- Non-recurring
Recurring
The recurring pack will charge the user automatically after the expiration of the package. If you set the billing cycle per 1 month then after 1 month the user will be charged. You have to know some important rules for the recurring package –
- The recurring package will charge automatically
- The package should have a price (it is not possible to create a free package for the recurring system)
- A recurring package can be purchased if you have Stripe Marketplace or PayPal Marketplace module active.
- A recurring package is not available to assign from the user profile.
Non-recurring
If you want user vendor to charge for a limited time frame then you can use non-recurring package. You can set a selected time frame like as 1 month or 1 year as the package validity.
- A non-recurring pack can be assigned from the user profile.
- You can use any WooCommerce gateway to purchase a non-recurring package. In order to configure the payment option, follow this document : https://docs.woocommerce.com/document/configuring-woocommerce-settings/#payments-settings
- You can create a non-recurring free package. By setting plan price as 0
Customize Membership Template #
You can customize your membership package template by configuring the given details.

| Subscribe Button Text – In the Subscribe Button Text field, you can write any text to represent the subscribe option. |
Membership List #
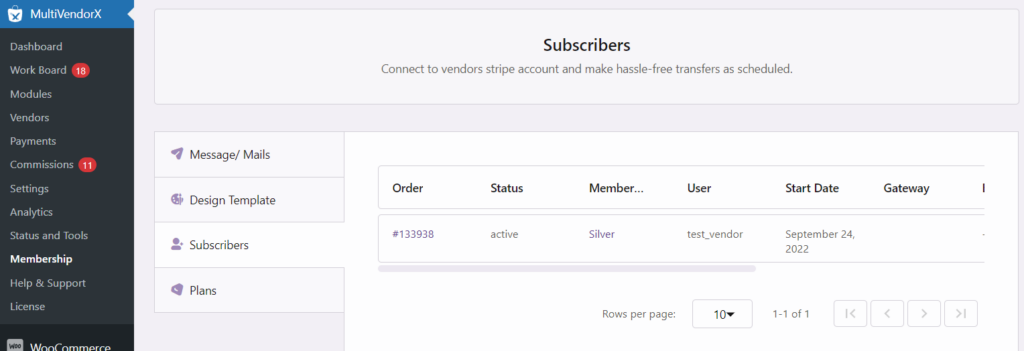
The membership list assists you in keeping track of vendors who subscribe to different membership plans. Along with this you can also approve or reject a vendor subscribing to a particular plan.
Sections available on a membership list are –
- Status – You can directly approve, activate, or reject a member/vendor, of membership pack, by hovering your cursor over the activation status.
- Membership – You can view the membership plan subscribed by the vendor
- User – The User section will display the name of the vendor
- Start Date – Under this section, you will be able to view the date on which a vendor subscribes to a plan
- Gateway – The gateway column of the membership list displays the payment method used by the vendor to pay for the membership plan
- Billing Amount – You can view the amount a vendor will pay each cycle, under this section
- Billing Period – This section displays the cycle period. We will learn a bit more about billing plans and billing cycle in the Membership Billing document.
- Next payment – You view the next date of payment under this section.
Subscribe to A Membership Package #
Let’s see how a new vendor subscribes to the membership package created by you.
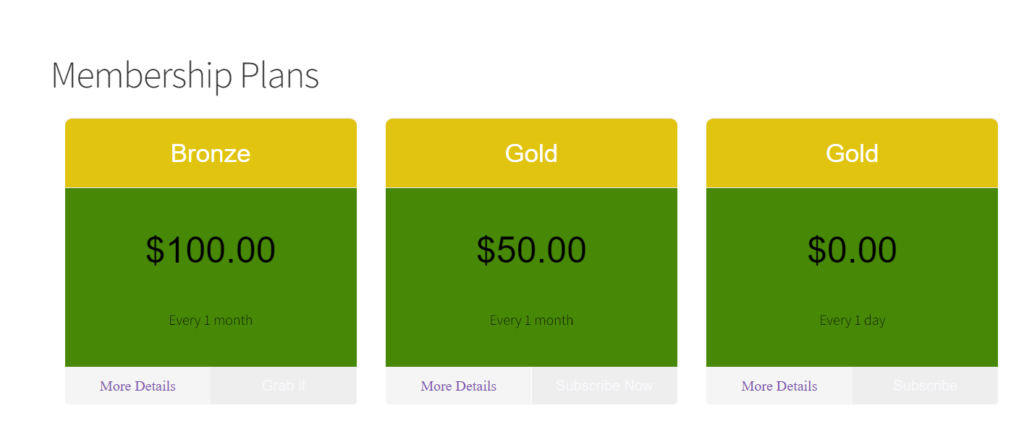
To subscribe to a membership pack a seller can-
- Go to the Vendor Registration menu option, available on the frontend shop site
- Once the Vendor Registration page loads, the seller would be able to see the various membership plans offered to them
- Based on the seller’s convenience, they can choose the membership plan of their choice.
- Once chosen, they can click on the Subscribe button or equivalent. Selecting the subscribe button would redirect them to the Registration form
- Once they fill in the required details available on the registration form they can select the Register button
- After the Register button is selected the vendors would have to pay for the membership plan.
- Once the payment is confirmed you can approve or reject the vendor.
Activate the Package Bought by the Vendor – Admin #
When a subscription pack is purchased, the admin has to activate it for the vendor. For activating admin have to go to wp-admin → WooCommerce → Orders and Complete the purchase order of the vendor.
Assigning a Package Manually by Admin #
An admin can even manually assign a package to a vendor. To do this admin must go to WordPress Dashboard → Users and pick the user. Then at the bottom of that page, you will find something like this.

Upgrade or downgrade Membership Plans #
Vendors who have subscribed to a membership package have the option to downgrade or upgrade their membership plans right from the frontend dashboard.
To upgrade or downgrade a membership plan the vendor must –
- Go to the Vendor Dashboard and select the Store Settings menu option
- From the list of Store Setting options, the vendor must then click on the Membership option
- Once the Membership page loads, the vendor can view his membership details.
- On the membership log visible to the vendor, he/she can then navigate to the Actions section and select the Upgrade or Downgrade option
- Once selected, the vendor would then be redirected to the membership payment page. There the vendor must choose the Back to Plan option
- As the vendor selects the Back to plan button he or she would then be able to view all the membership plans offered
- After deciding on the desired plan the vendor can then click on the Upgrade option and proceed with the payment
- Once the new plan is approved, the vendor would be able to enjoy all benefits the plan has to offer.
Note : For payments of recurring plans with PayPal you need to install WooCommerce Payments plugin and enable it and then activate PayPal to make payments.



Leave a Reply
You must be logged in to post a comment.