


Brief Introduction #
The Product Add-Ons feature in MultiVendorX Pro allows store owners to offer additional product customization options directly from their product pages.
Using this feature, store owners can add optional services, extra product features, custom input fields, file uploads, personalized messages, and more. These add-ons can also include additional charges, helping store owners increase average order value while giving customers a more personalized shopping experience.
For example, a store owner selling cakes can allow customers to add a custom message, upload a reference image, or select premium toppings for an extra fee.
This feature works by integrating MultiVendorX Pro with the WooCommerce Product Add-Ons plugin.
Requirements #
How the product add-ons workflow works #
The complete workflow involves three different roles:
Admin #
The admin enables the Product Add-Ons integration from the MultiVendorX module settings.
Store owner #
The store owner creates or edits products and adds customizable add-on fields to those products.
Customer #
Customers select their preferred add-ons while purchasing the product. Any additional charges are automatically added to the final product price during checkout.
Enabling product add-ons from the admin dashboard #
Before store owners can start adding extra product options to their products, the admin must first enable the Product Add-On integration module.
To enable the Product Add-Ons feature:
- Log in to the WordPress Admin Dashboard
- Navigate to MultiVendorX
- Select Modules
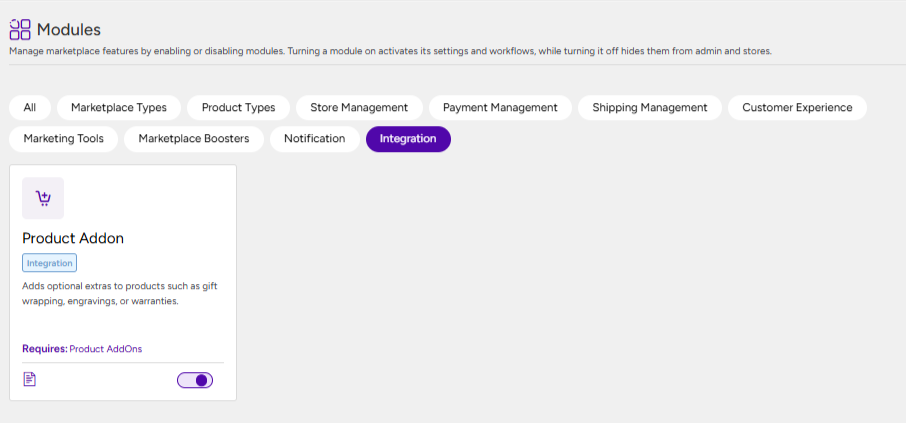
- Scroll down to the Integration section
- Locate the Product Addon module and enable the toggle option
Once the module is enabled, the Product Add-On configuration section will become available inside the Store Dashboard product management area.
Store owners can then start adding customizable fields, extra services, file uploads, and additional pricing options to their products.
Store owner workflow for configuring product add-ons #
Once the Product Add-On module is enabled by the admin, store owners can start adding customizable options to their products directly from the Store Dashboard.
Access the product add-on section #
To configure Product Add-Ons:
- Log in to the Store Dashboard
- Navigate to Products
- Click Add Product
Store owners can also edit an existing product if they want to add customization options to previously published products.
Once the product creation page opens:
- Add the required product details such as:
- Product name
- Description
- Images
- Pricing
- Inventory information
After entering the product information, scroll down to locate the Product Add On section.
This section allows store owners to create additional product customization fields that customers can interact with during purchase.
Add a new add-on field #
Inside the Product Add On section:
- Click the Add field button
A new add-on configuration panel will appear.
Store owners can then select the type of field they want to display on the product page.
Available field types #
The Field Type option defines the kind of input or selection customers can provide while purchasing the product.
Multiple choice #
Displays a list of selectable options for customers.
This field can appear as:
- Dropdown list
- Radio buttons
- Image selections
Checkboxes #
Allows customers to select one or multiple optional add-ons.
This is commonly used for:
- Gift wrapping
- Additional accessories
- Extra services
Customers can tick or untick the available options as needed.
Custom text #
Displays a single-line text input field.
Store owners can restrict the input type to:
- Text only
- Numbers only
- Text and numbers
- Email format
Custom textarea #
Displays a larger text area where customers can enter multiple lines of information.
File upload #
Allows customers to upload files directly from the product page.
Important:
Uploaded files become available in the order details after purchase so store owners can review customer submissions before processing the order.
Custome price #
Allows customers to enter a custom numerical amount.
The entered amount is automatically added to the final product price.
Allows customers to enter quantity values for additional product options or services.
Heading #
Allows store owners to add headings between add-on groups.
This helps organize multiple add-ons into sections and improves the customer experience on the product page.
Input Multiplier #
The Input Multiplier field allows store owners to multiply the entered customer value with a predefined pricing amount.
Date Picker #
The Date Picker field allows customers to select a specific date directly from the product page using a calendar interface.

Configure additional add-on settings #
After selecting the field type, store owners can configure additional settings for each add-on field.
Title #
Defines the label customers will see for the add-on.
The title can be displayed as:
- A heading
- A label
- Hidden completely
Description #
Allows store owners to add additional information about the add-on.
Descriptions help customers better understand:
- The purpose of the field
- Required input details
- Additional instructions
Required field #
This option makes the field mandatory.
If enabled, customers will not be able to add the product to the cart until the required information is provided.
Adjust price #
Allows store owners to charge additional fees for selected add-ons.
The pricing adjustment can be configured as:
- Flat fee
- Fee per quantity
- Percentage of the base product price
Once configured, the additional amount is automatically added to the product total during checkout.

Note:
Product Add-Ons are configured individually for each product unless global add-ons are configured separately through WooCommerce Product Add-Ons settings.
Customer purchase experience #
After the product is published, customers visiting the product page will see all configured add-on options directly below the product details.
Customers can:
- Select options
- Enter custom text
- Upload files
- Choose additional services
As customers interact with the add-ons:
- Product pricing updates dynamically
- Additional charges are calculated automatically
- Required fields are validated before checkout
Once the product is added to the cart:
- All selected add-on information becomes part of the order
- Store owners can review customization details from the order page
- Uploaded files and customer inputs remain accessible during order fulfillment

Important:
Additional charges from add-ons are included in the final order total and commission calculations.


