


Brief Introduction #
Payments are the backbone of any marketplace, but managing payouts can be complex and time-consuming. The PayPal Marketplace module simplifies this process by enabling seamless payment collection and automated store owner disbursements. With PayPal Marketplace, marketplace owners can handle multi-store transactions efficiently and securely in real time.
Requirements #
PayPal Account Setup #
To get started, you need a PayPal Business account. You can use either a Live account or a Sandbox account for testing.
PayPal Business Account #
Create a new PayPal Business account or log in to an existing one.
For testing purposes, you can use a Sandbox account via the PayPal Developer Dashboard.
Note: For live mode, ensure your PayPal balance is 0 before starting the integration.
API Credentials #
Log in to the PayPal Developer Dashboard and navigate to My Apps & Credentials.
Create a new app by clicking Create App, then enter the app name and select your business account.
Once the app is created, copy the following credentials:
- Client ID
- Client Secret
Use Sandbox credentials for testing and Live credentials for production.
Merchant ID #
Log in to your PayPal account and go to Account Settings → Business Information.
Copy the Merchant ID (Partner ID) from this section.
For Sandbox accounts, navigate to Accounts → View/Edit Accounts and copy the Account ID, which acts as the Merchant ID.
PayPal Marketplace Configuration (Admin End) #
To start using PayPal Marketplace, the admin first needs to enable the module from MultiVendorX → Modules → PayPal Marketplace from the Payment Management section. Once enabled, the PayPal Marketplace option becomes available for further configuration.

Next, navigate to MultiVendorX → Settings → Finance → Withdrawal Methods and enable the PayPal Marketplace payment option. Once enabled, you will need to provide the required PayPal credentials and configure the payment settings.
- Payment Mode – The Payment Mode determines whether transactions are processed in a testing or live environment. Use Sandbox mode while testing your integration, and switch to Live mode only when you are ready to accept real payments.
- Client Id – Enter the Client ID, which is your app’s public identifier issued by PayPal. Each environment (Sandbox and Live) has a different Client ID, so ensure you are using the correct one based on the selected payment mode.
- Client Secret – Add the Client Secret, which acts as a private key to authenticate your server when communicating with PayPal’s API.
- Partner Merchant ID – You will also need to provide the Partner Merchant ID, which is your PayPal Merchant ID as the marketplace owner. This is required to enable real-time split payments. Additionally, enter the Admin PayPal Email, which should be the email address linked to your PayPal Business account.
- Disbursement Mode – The Disbursement Mode allows you to control when funds are released to store owners after a successful order. If set to Immediate, store owners receive their share instantly at checkout. With On Order Completion, funds are released only after the order is marked as complete or delivered. The Delayed option holds the funds for a specified period before releasing them, allowing time for order verification or handling disputes.
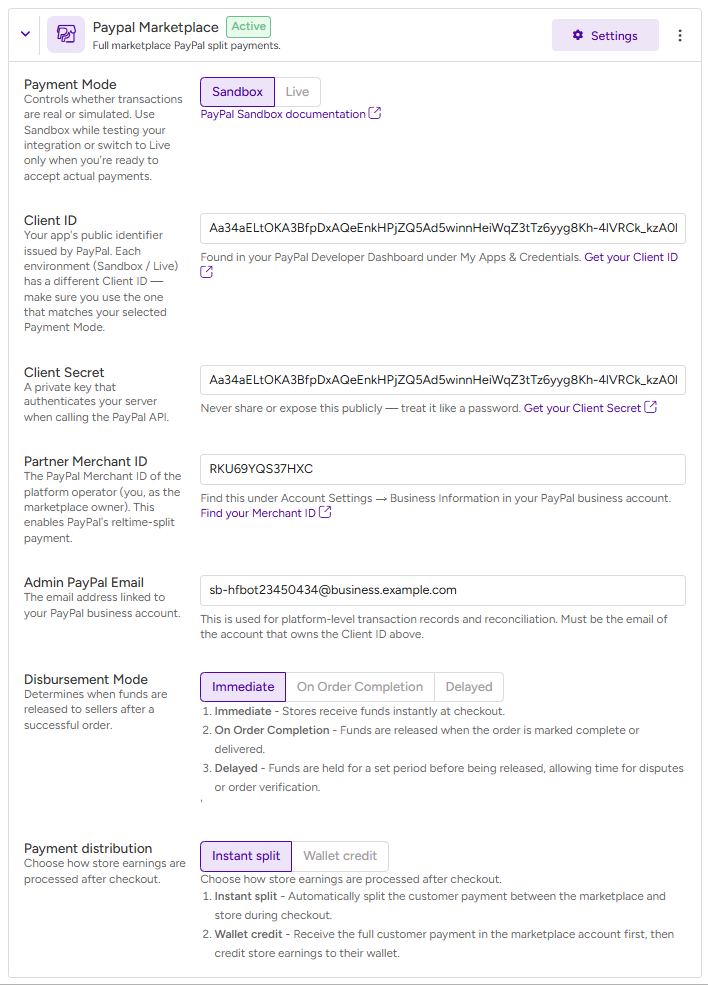
Once these settings are configured, the admin setup is complete. Store owners can then connect their PayPal accounts from their store dashboard to start receiving payments seamlessly.
Store Owner Configuration #
Store owners need to connect their PayPal account to start receiving payments. This can be done directly from the store dashboard.
Navigate to the Store Dashboard → Settings, and once the page loads, go to the Payout section. From the available options, select PayPal Marketplace.
Click on Connect with PayPal and complete the onboarding process. After successfully connecting, you will be redirected back to the Payout tab, where a confirmation message will indicate that the setup is complete.
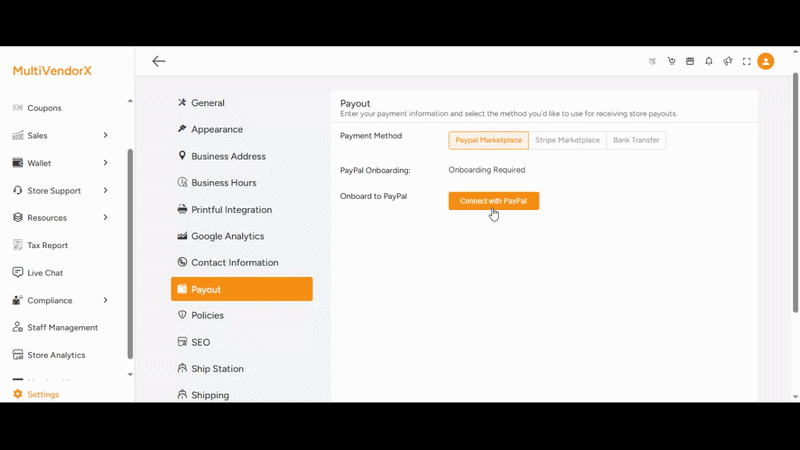
If needed, store owners also have the option to disconnect their PayPal account at any time by clicking on the Disconnect button.
Frontend Behavior #
- Customers can choose PayPal Marketplace at checkout.
- Payments are securely processed via PayPal.
- Store owners receive their share based on the configured disbursement mode.


