Brief Introduction #
A complicated onboarding process can make the best of us turn away. For vendors that are hard to find, you want an onboarding system that is simple, efficient and easy to operate. With the MultiVendorX registration form, you get to customize your registration form. Using our intuitive interface, you can add various formats to your form, automatically store answers and edit and change at your convenience.
Overview #
- Add new members to your marketplace
- Build your registration form
- Approve and add new vendors to your site
Add New Sellers #
While adding new users to your site can be as easy as falling off a rock, there is a small step we often skip. The following set of instructions will let new members to sign-up on your site –
- Go to the WordPress dashboard and navigate to the Setting menu. Once there, head to the General tab
- On the general page, go to the membership section and tick on the Anyone can register option.
- Select vendor as the new user default role
While we know most of you must have already completed this crucial step. There are users (me😜) who skip or forget this step. Following the given steps lets new users register as vendors.

Reference 1: Allow vendors to sign-up
Build Vendor Registration Form #
Now that we know how to let new users register, let’s learn more about MultiVendorX’s registration form builder. To start, let’s explore how one can access the registration form builder feature.
Access MultiVendorX Registration Form #
These simple steps will help guide you to MultiVendorX registration form builder.
- Go to your WordPress Dashboard and steer your cursor to MultiVendorX
- From the list of options available on the MultiVendorX menu, select the Settings option
- On the Settings page, you will discover various tabs. Drag your mouse to the Registration form option. Viola! There it is.
Customise Registration Form #
One advantage of building a personalised registration form is that you can add questions necessary for your marketplace. Thus, you can gauge if the vendor fits your marketplace by reviewing their submitted form.
- You can get started by filling out the Form Title and the Form Description fields. Form titles can be fun or informative. On the contrary, you can use form descriptions to give vendors specific instructions.
- Next, you have the Form Box, which is quite basic and easy to use. Clicking on the form field will allow you to add your questions.
- While you add your questions to the registration form you can also decide on the format of the question from the following options –
- Textbox – The textbox format is easy to configure and allows you to ask generic questions like vendor name, store name etc.
- Placeholder – The placeholder is the section where the vendor will add their answer. You can leave the placeholder section blank or add instructions you want the vendor to follow.
- Tooltip Description – Tooltip descriptions are informative messages that inform the vendor about special instructions.
- Textbox – The textbox format is easy to configure and allows you to ask generic questions like vendor name, store name etc.

- Email – Ask the vendor to add the email address through this format.
- URL – You can use this question to ask a vendor about the URL to their site or the URL of their previous marketplace.
- Textarea – Use the textarea to ask vendors to add a description about a particular product or essential features of their store.
- Character Limit – Add limitations to the number of characters vendors add when writing their descriptions.

- Checkboxes – You can give vendors options to select from by using the checkbox format.
- Label – You can add your options in the label section
- Value – Developers use this feature to distinguish each option while coding. Leave this option blank or view it here to learn more about it.
- Add New – You can select this button to add new options to your checkbox format.
- Multi-Select – Unlike a checkbox format, the multi-select option lets your vendors choose multiple options.
- Radio Buttons – Radio buttons provide options for sellers to select their desired response.
- Drop-Down – The drop-down option permits your vendors to pick the preferred option. You can upload your alternatives within the label area and use the add new choice button to maintain adding new choices.

- reCAPTCHA – The reCAPTCHA format option is a good way of keeping your site safe. Its advanced risk analysis engine helps keep malicious software from engaging in abusive activities on your website. You can also register for a reCAPTCHA on google by selecting this link. Given below are the two reCaptcha types –
- reCAPTCHA v2 – The reCAPTCHA v2 requires the user to click the “I’m not a robot” checkbox and can serve the user an image recognition challenge.
- Recaptcha Script – You can safely add your reCAPTCHA v2 to your marketplace by following this documentation.
- reCAPTCHA v3 – Unlike the reCAPTCHA v2 option, the reCAPTCHA v3 runs in the background and generates a score based on a user’s behaviour. The higher the score, the more likely a user is human. Here you need to add a site key and secret key. To get your Site Key and Secret Key follow these steps –
- Go to the reCaptcha page. Once there, select the Admin Console option.
- Enter a label for your ReCaptcha and select the V3 checkbox.
- Add the URL for your site in the Domain section.
- Accept the terms of service and click Submit. Copy the Site Key and Secret Key that Google generates and paste them here.

- Attachment – The attachment format is helpful when you want your vendors to upload files.
- File Type – From the range of options presented in the illustration … you can select your preferred file type.
- Maximum File Size – Add a value in the file size field to limit the size of the file a vendor can upload.

- Section – The section format divides the registration form into sections.
- Store Description – As the name suggests, use this format to ask vendors to describe their stores, for example – a toy store or a store for furnishing etc
- Address 1 & 2 – If a seller has more than one store, you can give them the option to add the address of their primary and secondary store.
- Phone – Allow users to add their contact information through the phone format.
- Country – Give vendors the option to add their country names.
- State – Similar to the country format, let vendors add the name of their state.
- City – Vendors can add the name of the city operate in.
- Postal Code – Giving vendors the option to add the postal code is always a plus, especially if you are considering shipping.
- PayPal email– You can ask your vendor to add their PayPal email right from the go using this format option.
- Since you have a basic understanding of each format option, you can start building your personalised registration form. The other key features that will help in the building process include the following icons –
- Copy Icon – The copy icon helps duplicate a question you added.
- Delete Icon – The delete icon deletes your question field
- Add Icon – You can use the add icon to add new questions to your registration form.
- Required Option – If you don’t want to let vendors skip a particular question, select this option.

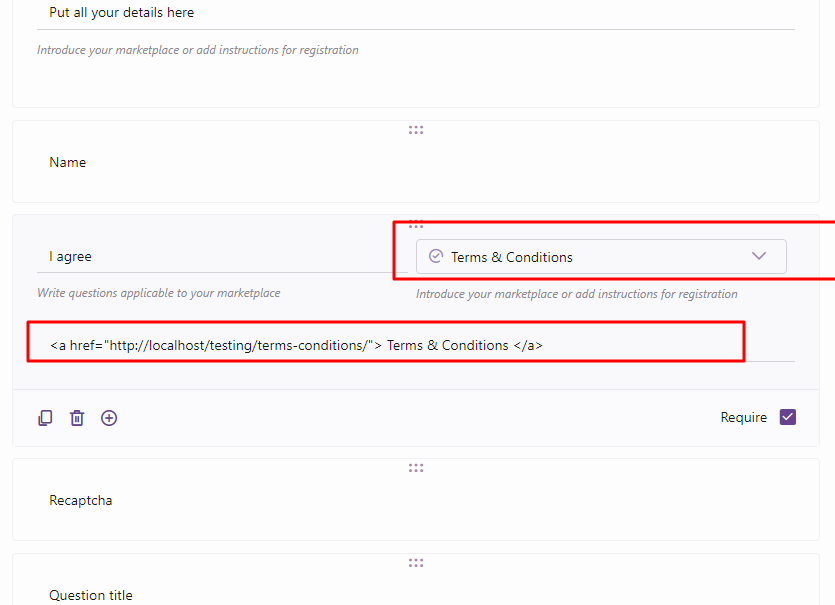
Terms & Conditions – With this format the admin can link their terms and conditions page and the vendor can choose to agree to those terms & conditions by checking the box while registering on the site.
- See, wasn’t that easy! Start building your registration form right away!
Approve Sellers #
The customisable registration form counts for a simple registration process which means you’ll have quite a few vendors lined up for approval. But before you get started with that, here is a small admin set-up for you to complete.
- Go to the MultiVendorX available on your dashboard and then navigate to the Settings option.
- The Setting page opens on the General Settings tab. Available on the General Tab is the Approve Seller option.
- You can either admit sellers directly by selecting the Automatically option. Or accept them Manually after evaluating the registration form.

Automatic Approval of New Sellers #
The process of accepting sellers automatically is as easy as toasting bread. All you need to follow is just one step,
- Go to MultiVendorX Settings and available on the General page is the approve vendor option.
- Change the option to the Automatically Setting. This will allow newly signed-up users to gain access to their dashboard instantly.
While this method is easy and hassle-free, we would recommend for the safety of your site to follow the manual process of registration.
Manual Approval of New Sellers #
If you have chosen the Manually option of accepting sellers, here are two ways to get the job done.
Approve Through Taskboard #
Approving through the taskboard helps save time to complete other tasks. So, let’s take a look at how this method works.
- Go to the MultiVendorX option on your WordPress dashboard and select the Workboard option.
- Once the Workboard page opens and displays the Taskboard tab, go to the pending vendor approval section.
- Under the pending vendor approval section, you’ll see a list of vendors awaiting your approval. Each vendor box contains a set of action icons. These icons represent the following actions –
- Edit Icon – Selecting the edit icon will let you review a vendor’s profile and make changes if required. Once checked, you can approve the vendor by proceeding to the vendor application tab and selecting the approve button.
- Approve Icon – As the name suggests selecting this icon will allow you to approve vendors directly from the dashboard.
- Dismiss Icon – The work of the dismiss icon is to remove vendors from the taskboard for later consideration. Selecting this icon will lead to a pop-up asking for confirmation. Once selected, the name of the vendor gets removed from the taskboard. Nonetheless, you can view these vendors in the vendor list.
- To approve your pending vendor, select the Approve Icon.

Approve Through Vendor’s Log #
While approving vendors through taskboard can be a time saver, accepting vendors by going through the vendor log will give you a fair idea about each vendor. With this, you can either glance at a vendor profile before making an informed decision or read through the entire profile. Now let’s take a look at how we can use this method.
- Go to your admin dashboard and select the MultiVendorX option. Once selected, choose the Vendors option available in the MultiVendorX menu.
- Once the Vendor’s page loads, drag your cursor to the selected candidate. While skimming through your list, you can identify vendors based on their registration statuses.
- After selecting your chosen vendor, select the preview icon visible beside the vendor’s name. Selecting the icon will lead to a pop-up that displays basic vendor-related information. If you are pleased by the information available, choose the Approve option.
- Alternatively, you can approve the vendor after going through their profile. For this, you will have to select the chosen vendor’s name. Selecting the vendor will transport you to your vendor’s application data tab. Similar to the above mention step, read your vendor’s profile and make a choice.

With this, we come to the end of our vendor registration process. We hope this document was informative and helpful. In case you have any queries or difficulties don’t forget to ping our support team always available at your convenience.


Leave a Reply
You must be logged in to post a comment.