




Brief Introduction #
If you are thinking of offering services or products that need to be pre-booked, the Bookable Product type is your go-to option. With MultiVendorX Pro, adding and managing a bookable product can be done easily in very easy steps. This document shows you how to create a bookable product and how to manage them.
Requirements #
Bookable Product Configuration #
Admin Configuration #
You can now turn your basic marketplace into a bookable marketplace by letting sellers upload and manage bookable products. Given below is how you as an Admin can set up a bookable product option for the vendors.
To let a seller upload a bookable product an Admin must –
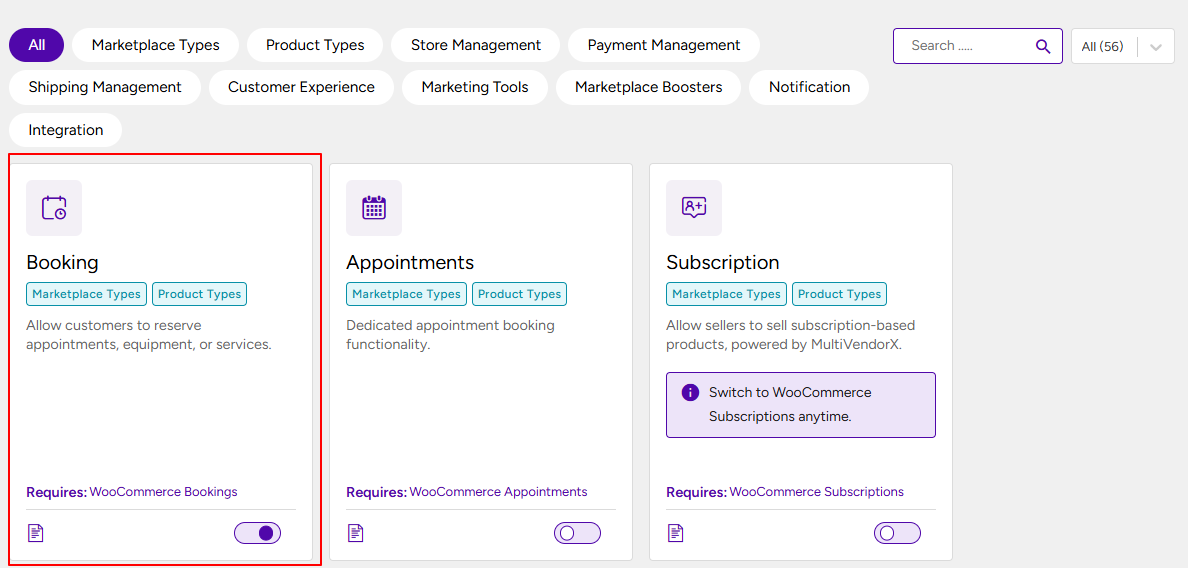
- Go to the WordPress dashboard and navigate to the MultiVendorX option. From the List of options, the admin must then select the Module option.
- Once the Module page loads the admin can then go under Marketplace Type option.
- From there, the admin must select the Booking option.
Note: Make sure that the WooCommerce Booking plugin is installed and activated. This is because MultiVendorX provides you with the benefit of availing of this WooCommerce feature to multiple sellers. Hence letting you create a multi-vendor booking marketplace, where various sellers can provide the same benefit.
Store Settings #
Now that you have enabled stores to upload booking products, we will be going through the settings on the vendor’s end.
Create A Bookable Product #
- As soon as the New Product Page loads, the store owner must fill-in required details like the product name, product description, product gallery, etc, by following the simple product document.
Now, let us move to the main section of this article: Product Type.
Under this section, the store owner needs to select Booking Product as the product type. Once the product type is selected, several configuration options will become available. Sellers can configure these settings based on how they want customers to book the product or service.
General #
The General section allows sellers to configure the basic booking duration and calendar display settings.
- Booking Duration – The Booking Duration setting determines how the booking period is defined. Sellers can choose between the following options:
- Fixed Blocks – This option allows sellers to define fixed booking periods. Customers can book the product only for the predefined blocks set by the seller.Example: If a seller provides appointments only on Wednesdays and all Wednesday appointments for the current week are already booked, customers will need to wait until the next available Wednesday to make an appointment.
- Customer-Defined Blocks – This option allows customers to choose the duration of their booking based on their requirements.Example: A coworking space may be available in one-hour blocks. Customers can choose how many one-hour blocks they want to book based on their requirements.When Customer-Defined Blocks is selected, the following options are available:
- Minimum Duration – Defines the minimum amount of time for which a customer can make a booking.
- Maximum Duration – Defines the maximum amount of time for which a customer can make a booking.
- Enable Calendar Range Picker – Allows customers to select a start date and an end date from the calendar. This option is available only when Customer-Defined Blocks is selected.
- Calendar Display Mode – The Calendar Display Mode setting determines when the booking calendar is displayed to customers. It includes the following options:
- Display Calendar on Click – The calendar is displayed only when the customer initiates the booking process.
- Calendar Always Visible – The calendar remains visible while customers browse the product. This option is enabled by default.
Cost Ranges #
Pricing a bookable product is slightly different from pricing a simple product. Sellers can configure separate pricing components based on the booking structure.
The available pricing options are:
- Base Price – The base price is the primary amount charged for the product or service, regardless of the booking duration.
- Block Price – The block price is the amount charged for each individual booking block.Example: If a spa service is available in one-hour blocks and the block price is $10, booking one hour will cost $10. Booking two hours will cost $20 ($10 × 2 blocks).
- Display Cost – This determines the cost displayed to customers when they view the bookable product.
- Set a Price Range – Sellers can add range for adding base and block cost.
To add a price range:
- Select Add Range under the Range Type section.
- Configure the following settings:
- Range Type – Determines the type of period to which the pricing rule applies. Depending on the available options, sellers can configure pricing for a specific day, week, month, or other defined periods.
- Range – Defines the start and end dates for which the pricing rule should apply.
- Arithmetic Symbols – Allows sellers to modify the original base or block price using arithmetic operations such as Add (+), Subtract (-), Multiply (×), or Divide (÷).
- Base Price – The base price configured within a range is applied to the original base price according to the selected arithmetic operation.
Example: If the original base price is £100 and the seller selects Add (+) and enters £5, the resulting price will be £105.
- Block Price – The range block price works in the same way as the range base price. Sellers can use the selected arithmetic operation to add, subtract, multiply, or divide the range block price from the original block price.
Note: Sellers can create different base and block prices by configuring different date ranges. If multiple pricing rules apply to the same date range, sellers can use the Priority setting available under the Availability tab to determine which rule should take precedence.
Availability Rules #
The Availability tab allows sellers to control when their products or services can be booked and how many bookings can be accepted during a particular period.
To configure availability, sellers can use the following settings:
- Maximum Bookings Per Block – Maximum Bookings Per Block determines how many bookings can be accepted for the same block.
Example: If a seller is hosting an online event and sets the maximum bookings per block to 100, up to 100 customers can book the event during the same block.
- Maximum or Minimum Blocks Bookable – These settings determine the minimum and maximum number of blocks that a customer can book.
For example, if the current date is April 1 and the minimum bookable period is set to one month, the earliest available booking date will be May 1.
- Buffer Period Required Between Bookings – The Buffer Period allows sellers to define a period between bookings during which the product or service cannot be booked.
Example: A seller offers appointments in two-hour blocks and requires a one-hour break between appointments. The seller can configure a one-hour buffer period between bookings.
- Adjacent Buffering – Enable this option if the seller wants the buffer period to apply both before and after a booking.
- All Dates Availability – This setting determines whether booking blocks are available by default.
- Available by Default – All blocks are considered available by default. Sellers can then use availability rules to make specific blocks unavailable.
- Not Available by Default – All blocks are unavailable by default. Sellers must use availability rules to make specific blocks available.
- Availability Rules – Availability Rules allow sellers to further customize when their products or services can be booked.
The following options are available:
- All Blocks Being Blocked – Checks the availability of every block included in a customer’s booking.Example: If a customer books six days and each block represents one day, the system checks the availability of all six blocks before confirming the booking.
- The Starting Block – Checks only the first block selected by the customer.Example: If a customer books four days and each block represents one day, the system checks the availability of the first day only.
- First Block Starts At – Allows sellers to define the time at which the first booking block can begin. This is useful when sellers want to restrict bookings to specific hours.
- Restrict Selectable Days – Allows sellers to prevent customers from selecting specific days. Once a day is restricted, customers will not be able to select that date from the booking calendar.
- Add Range – Sellers can add availability ranges to define when a product or service can be booked.
To add an availability range, configure the following options:
- Range Type – Defines the period to which the availability rule applies. The available range types are similar to those available in the Cost section.
- Range – Defines the start and end dates or times for the availability rule.
- Bookable – Determines whether the product should be available for booking during the specified range.
- Priority – Determines which availability rule should take precedence when multiple rules apply to the same period.
Example: A seller may allow bookings from 10 AM to 10 PM on Thursdays in May, while allowing bookings only from 1 PM to 3 PM on Thursdays in June. By assigning different priority levels, the seller can determine which rule should take precedence when overlapping rules exist.
Note: Rules with lower priority numbers override rules with higher priority numbers. For example, a rule with priority 9 overrides a rule with priority 10. When rules have the same priority, their order determines which rule takes precedence.
Resources Tab #
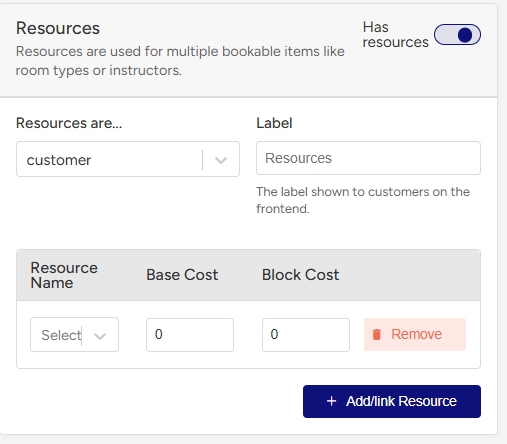
The Resources tab allows sellers to offer additional resources or amenities along with a bookable product or service.
For example, a hotel may offer different room types, while a fitness center may offer access to a pool or gym. Similarly, a salon may offer additional services that customers can select while making a booking.
To enable resources, select Has Resources in the product data section.
Once enabled, sellers can configure the following details:
- Label – Enter a name for the resource.
- Resources Are – Determines how the resource is assigned to customers.
- Customer Selected – Customers can choose whether they want to include the resource in their booking.
- Automatically Assigned – The system automatically assigns the appropriate resource based on the configured criteria.Example: If a room booking is made for four people, the system can automatically assign a Deluxe room instead of a regular room, depending on the seller’s configuration.
- Add/Link Resource – Allows sellers to add or link a resource to the bookable product. Sellers can also configure an individual price for the resource.
The resources assigned to a booking can be managed from the Manage Booking section.
Person Tab #
Certain types of bookings, such as accommodation, events, or movie reservations, may need to limit the number of people who can book a product or service. These restrictions may be required because of limited space, available resources, or other operational requirements.
MultiVendorX allows sellers to configure bookings based on the number and type of people included in a reservation.
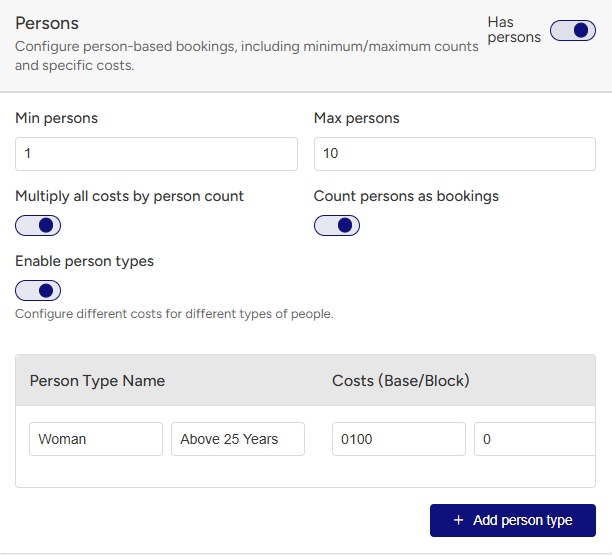
To enable person-based bookings, select Has Person in the product data section.
Once enabled, sellers can configure the following options:
- Minimum or Maximum Persons Per Booking – These settings allow sellers to define the minimum and maximum number of people that can be included in a single booking.
Example: A movie theater has a limited number of seats available. The seller can define the minimum and maximum number of people allowed in a reservation based on the available capacity.
- Multiply Cost by Persons Count – This option allows sellers to calculate the booking cost based on the number of people rather than only the booking duration.
For example, instead of charging a fixed amount for a one-hour booking, a seller can charge based on the number of people included in the booking.
- Count Persons as Bookings – This option determines whether each person included in a booking should count toward the Maximum Bookings Per Block limit configured under the Availability tab.
When enabled, each person is counted as an individual booking until the maximum number of bookings configured for the block is reached.
- Enable Person Types – The Enable Person Types option allows sellers to create different pricing and configuration rules for different types of people, such as adults, children, or other customer categories.
Once enabled, sellers can configure the following details:
- Person Type Name – Enter the name of the person type, such as Child, Adult, or Women.
- Base Price – Defines the basic price charged for the person type.
- Block Price – Defines the amount charged for each booking block for that person type. For more information, refer to the Cost Ranges section above.
- Description – Allows sellers to provide additional information about the person type.Example: For a Child person type, the description could specify that the category applies to customers under 10 years of age.
- Minimum and Maximum – Defines the minimum and maximum number of people of that type that can be included in a booking.Example: A seller running a Women’s Day promotion may allow up to 20 customers under the Women person type while limiting the Men person type to 10 customers.
Add a Booking Order Manually #
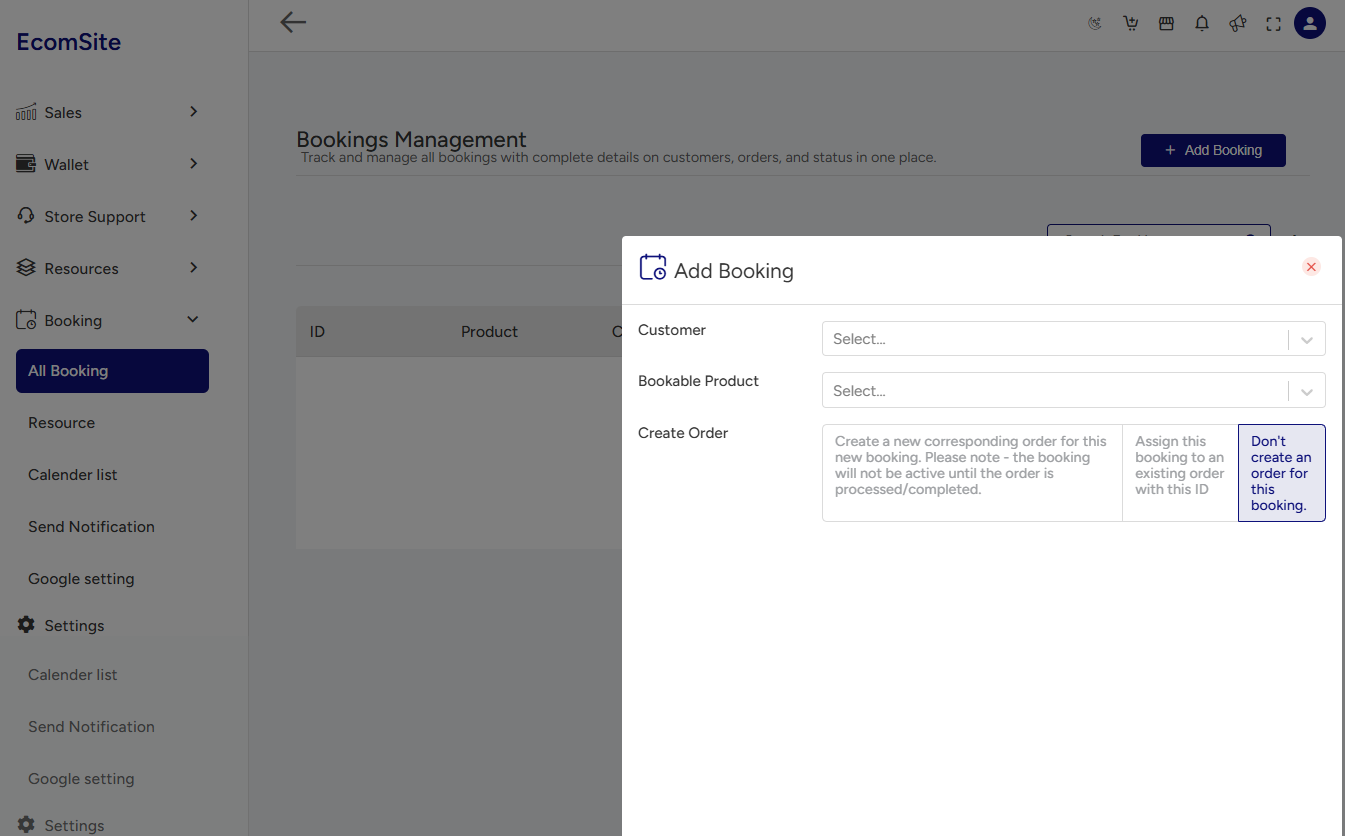
Sellers can also create a booking order manually from their Store Dashboard. This is useful when a booking needs to be added on behalf of a customer instead of being placed directly through the storefront.
To add a booking manually:
- Navigate to Store Dashboard → Bookings → All Bookings.
- Click Add Booking.
- You will be redirected to the Add Booking page, where you can enter the required booking details.
- Add the Customer Details and select the Booking Product.
- Configure the required booking details and complete the order.
Once all the required information has been added, the seller can create the booking order manually.
Store Booking Manager #
Sellers can manage all bookings for their products directly from their Store Dashboard.
Manage Bookings #
To view and manage bookings, sellers can navigate to Bookings → All Bookings from their Store Dashboard.
Here, sellers can view the booking details associated with their store, including:
- Booking ID – The unique ID assigned to the booking.
- Product – The product associated with the booking.
- Customer – The customer who placed the booking.
- Order Status – The current status of the booking order.
- Booking Date – The date associated with the booking.
View Bookings in Calendar #
Sellers can also view their bookings in a calendar format. To do so, they can navigate to the Calendar List section, where they can view their bookings based on their scheduled dates.
This provides sellers with a convenient way to keep track of upcoming and scheduled bookings.
Connect Google Calendar #
MultiVendorX also allows sellers to connect their Google Calendar with their store. This helps sellers manage and keep track of their bookings through their Google Calendar.
To connect Google Calendar:
- Navigate to Bookings → Google Settings from the Store Dashboard.
- Enter the required Google Calendar API details.
- Connect the Google Calendar with the store.
Once connected, sellers can use their Google Calendar to manage and keep track of their store’s bookings.