


Brief Introduction #
The Stripe Connect payment option in MultiVendorX enables seamless and secure commission payouts by directly connecting store owners’ Stripe accounts to the marketplace. Designed for automation and scalability, this module allows admins to distribute payments efficiently while ensuring compliance with Stripe’s payment standards. With Stripe Connect, store owners can receive their earnings automatically, reducing manual effort and simplifying marketplace financial operations.
Configuration from the Admin Dashboard #
To configure Stripe Connect in MultiVendorX, follow the steps below:
- Log in to the Admin Dashboard and navigate to MultiVendorX → Settings.
- Open the Finance tab and go to the Withdrawal Methods section.
- Locate Stripe Connect and click Enable.
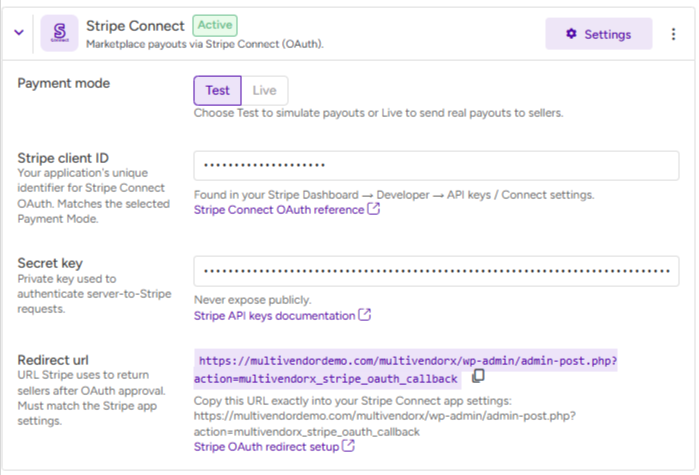
Once enabled, configure the Stripe Connect settings by filling in the required fields:
- Stripe Client ID
- Stripe Secret Key
To complete the setup:
- Copy the Redirect URL from your Stripe dashboard and paste it into the corresponding field in MultiVendorX.
You can find this in Stripe under:
Settings → Connect → Onboarding options (OAuth). - Generate and copy the API Keys (Publishable Key and Secret Key) from your Stripe dashboard under:
Developers → API keys. - Obtain the Client ID from the same Connect → Onboarding options (OAuth) section in Stripe.
Switching from Test Mode to Live Mode #
To move from Test Mode to Live (Production) Mode for Stripe Connect, follow these steps:
- First, disconnect all existing store owner Stripe accounts that were connected in Test Mode.
- Next, go to MultiVendorX → Stripe Settings and disable the Test Mode option (or enable Live Mode, as applicable).
- Finally, replace all Test credentials with your Live Stripe credentials, including the Client ID and API keys.
Once these steps are completed, Stripe Connect will be ready to process live payments.
Stripe Configuration from the Store Dashboard #
Now that you have learned how to configure Stripe Connect from the admin side, let’s look at how a Store Owner can set it up from their end.
- After logging in to the Store Dashboard, the store owner needs to navigate to Settings and open the Payout Settings section. From the list of available payment methods, they should select Stripe Connect and click the Connect with Stripe button. This action links the store owner’s Stripe account with the admin’s marketplace account.
The store owner will then be redirected to the Stripe Connect onboarding page, where they must complete the required steps and authorize Stripe. Once the process is completed successfully, the store owner will be redirected back to the Payout Settings page. At this point, the Connect with Stripe button will be replaced with Disconnect Stripe Account, indicating that the account has been successfully connected.


