




Brief Description #
The External Product type in MultiVendorX Pro allows store owners to list products on their marketplace that are sold on a third-party website instead of being purchased directly through their own store.
When a customer views an external product, they will see a customizable call-to-action button (such as Buy Now, View Product, or Visit Store) that redirects them to the specified external URL. This makes it easy for store owners to promote affiliate products, partner listings, or items available on another website without managing inventory, shipping, or order fulfillment within the marketplace.
This product type is ideal for affiliate marketing, cross-promotions, and showcasing products from external vendors while still providing customers with a seamless browsing experience.
Requirements #
Configuration from the Admin Dashboard #
Before store owners can create External Products, the marketplace administrator must enable the feature.
To enable the External Product functionality, navigate to MultiVendorX → Modules → Product Types from the WordPress Admin Dashboard.
Locate the External Product module and enable it. Once activated, store owners will gain the ability to create and manage External Products directly from their Store Dashboard.
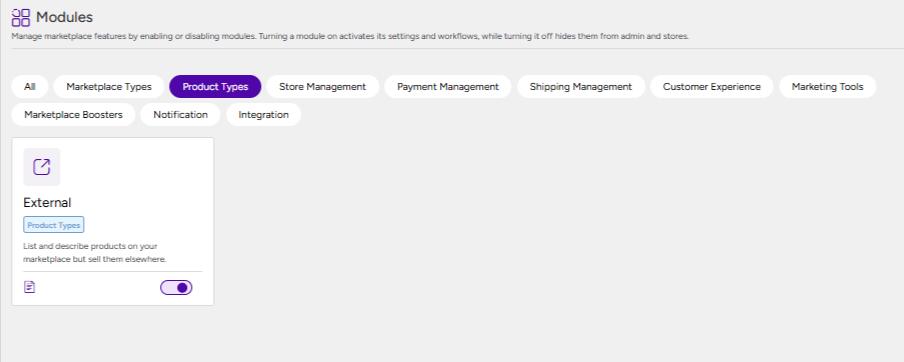
No further configuration is required from the admin side.
Configuration from the Store Dashboard #
After the administrator enables the External Product module, store owners can create External Products directly from their Store Dashboard.
Step 1: Create a New Product #
Navigate to Store Dashboard → Products → Add New.
On the product creation page, the first setting you need to configure is the Product Type. From the available options, select External Product.
Step 2: Add the Basic Product Information #
Once the product type is set, fill in the essential product details, including:
- Product Title
- Product Description
- Short Description (if applicable)
- Product Image
- Product Gallery
- Product Category
- Any other relevant product information
Step 3: Configure the General Settings #
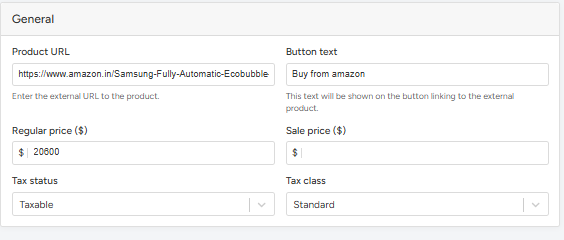
Under the General tab, configure the following fields specific to the External Product type:
- Product URL – Enter the URL of the product on the external or third-party website. Customers who click the product button on your marketplace will be redirected to this URL to complete their purchase.
- Button Text – Specify the label for the action button that will appear on the product page. Examples include Buy Now, View Product, or Visit Store.
Instead of adding the product to the shopping cart, this button redirects customers to the external website specified in the Product URL.
- Pricing – You can also configure the standard pricing fields, such as:
- Regular Price – The normal selling price of the product.
- Sale Price – An optional discounted price.
- Sale Price Schedule – Configure start and end dates for the sale price if needed.
- Tax Status – Set the applicable tax configuration.
Step 4: Publish or Submit the Product #
After reviewing all the details, click Publish to make the product live or Submit for Review if your marketplace requires administrative approval.
Once published, customers will see the custom action button on the product page and will be redirected to the configured external website when they click it.