


Brief Introduction: #
When operating a marketplace keeping track of your sellers is as important as keeping track of products or orders. This is why MultivendorX has introduced a seller management system that helps keep a list of all your stores and any helpful information related to them. To see how these works keep reading.
Overview #
MultivendorX helps Admin manage their stores by:
- Helping them keep a list of stores irrespective of their activation status
- Manage and edit store’s information
- Set store wise Commission
- Manage store dashboard
- Manager store’s shipping
Add and Manage Stores #
Add New Store Owners #
Before we start we hope you have gone through this document to understand how stores can register on your site. While registration is the best way to add sellers to the site, you also have the option to add sellers manually from the admin dashboard directly. Follow the steps given below to add stores directly.
- Go to your admin dashboard. Navigate to Users → Add New. Create a new user and assign the role as Store Owner.
- Next, go to MultiVendorX → Stores. Click on Add New. Enter the required details:
- Store Name
- Store Slug
- Store Email
- Store Owner
- Profile Image
- Click on Save.

Add Vendor – WordPress #
An alternate way of adding vendor directly is to change his or her user role. To Assigns ‘vendor’ role to an existing user by using WordPress you must:
- Go to the dashboard and then navigate to users.
- Select Add New if the user is new to WordPress or go to All Users in case he or she is an existing user. If he or she is an existing user select the edit option available under their Id and that would take you to the user page.
- Once you get to the User page add or edit details if required.
- After you are done adding the details, simply change the user role to Vendor.
- Save you changes to welcome the added vendor.

Vendors List #
When any vendor registers on your site, irrespective of his active or inactive status, his name will be displayed on the vendor’s list found under Vendors submenu of the MultivendorX menu in the admin dashboard.
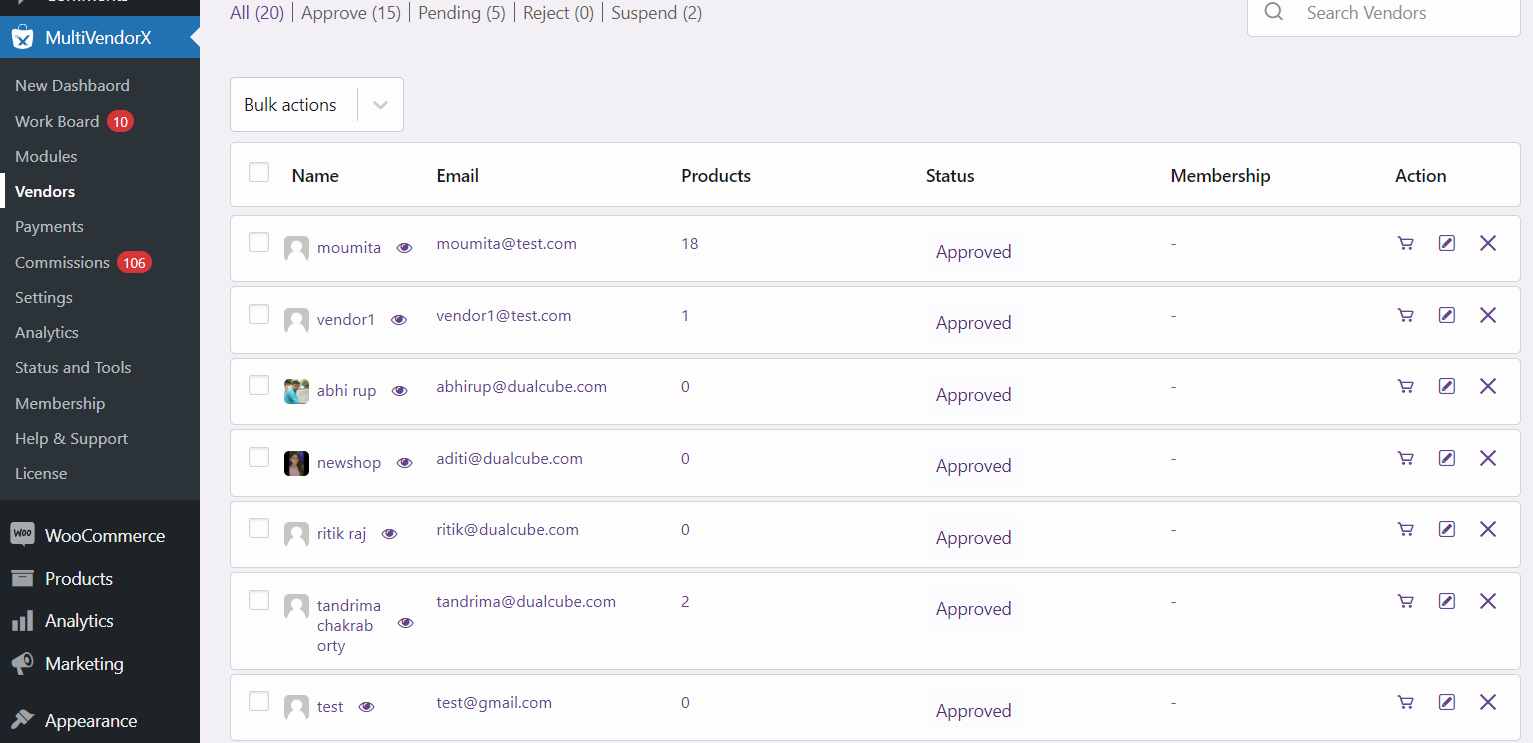
The vendor’s list would contain:
- The name and email id of the vendor registering on the site
- Get a glance of vendors information with the eye icon symbolizing preview. Example of vendor’s information includes the vendor’s personal information, withdrawal amount and his performance in the last 30 days based on his orders, sales, earnings and withdrawal amount. You can also check the vendor’s rating as well as his activation status. Not only this, you can also manually change his activation status.
- The date on which the vendor had registered on the admin’s site
- The number of products created by that vendor
- The vendors account activation status i.e pending, approved, rejected or suspended.
- Admin can also see the total number of vendors along with the number of vendors that have been approved, rejected, suspended and are waiting for approval.
Managing Vendors Information #
You can also help manage each vendor’s individual accounts by adding or editing information. In order to open each vendor’s account details
- Go to the admin dashboard from there select the MultivendorX menu and then go to the Vendors submenu
- Once the Vendors page loads, select the name of the vendor whose account you want to view or edit.
Personal Information #
Here, you can view or edit personal information details filled in by the vendor like from his when he submitted his form. You can also add or change any information about the vendor if required.

- Username: The usernames filled in by the vendor when registering on your site is displayed here. This information cannot be changed.
- Password: This field is usually kept blank so that vendors can update their passwords.
- First Name: the first name of the vendor
- Last Name: The last name of the vendor
- Email: This is a required piece of information that the vendor will have to add when he registers on your site
- Nickname: You can add a nickname for the vendor that will help you remember
- Display Name: This is the name that will be displayed on the shop page of the vendor’s shop
- Profile Image: The vendor can add his image here from his dashboard or you can do it for him.
Store Information #
Here you can view information regarding the vendor’s store. This store information is generally filled in by the vendors in the Shopfront menu found in the vendor’s dashboard.
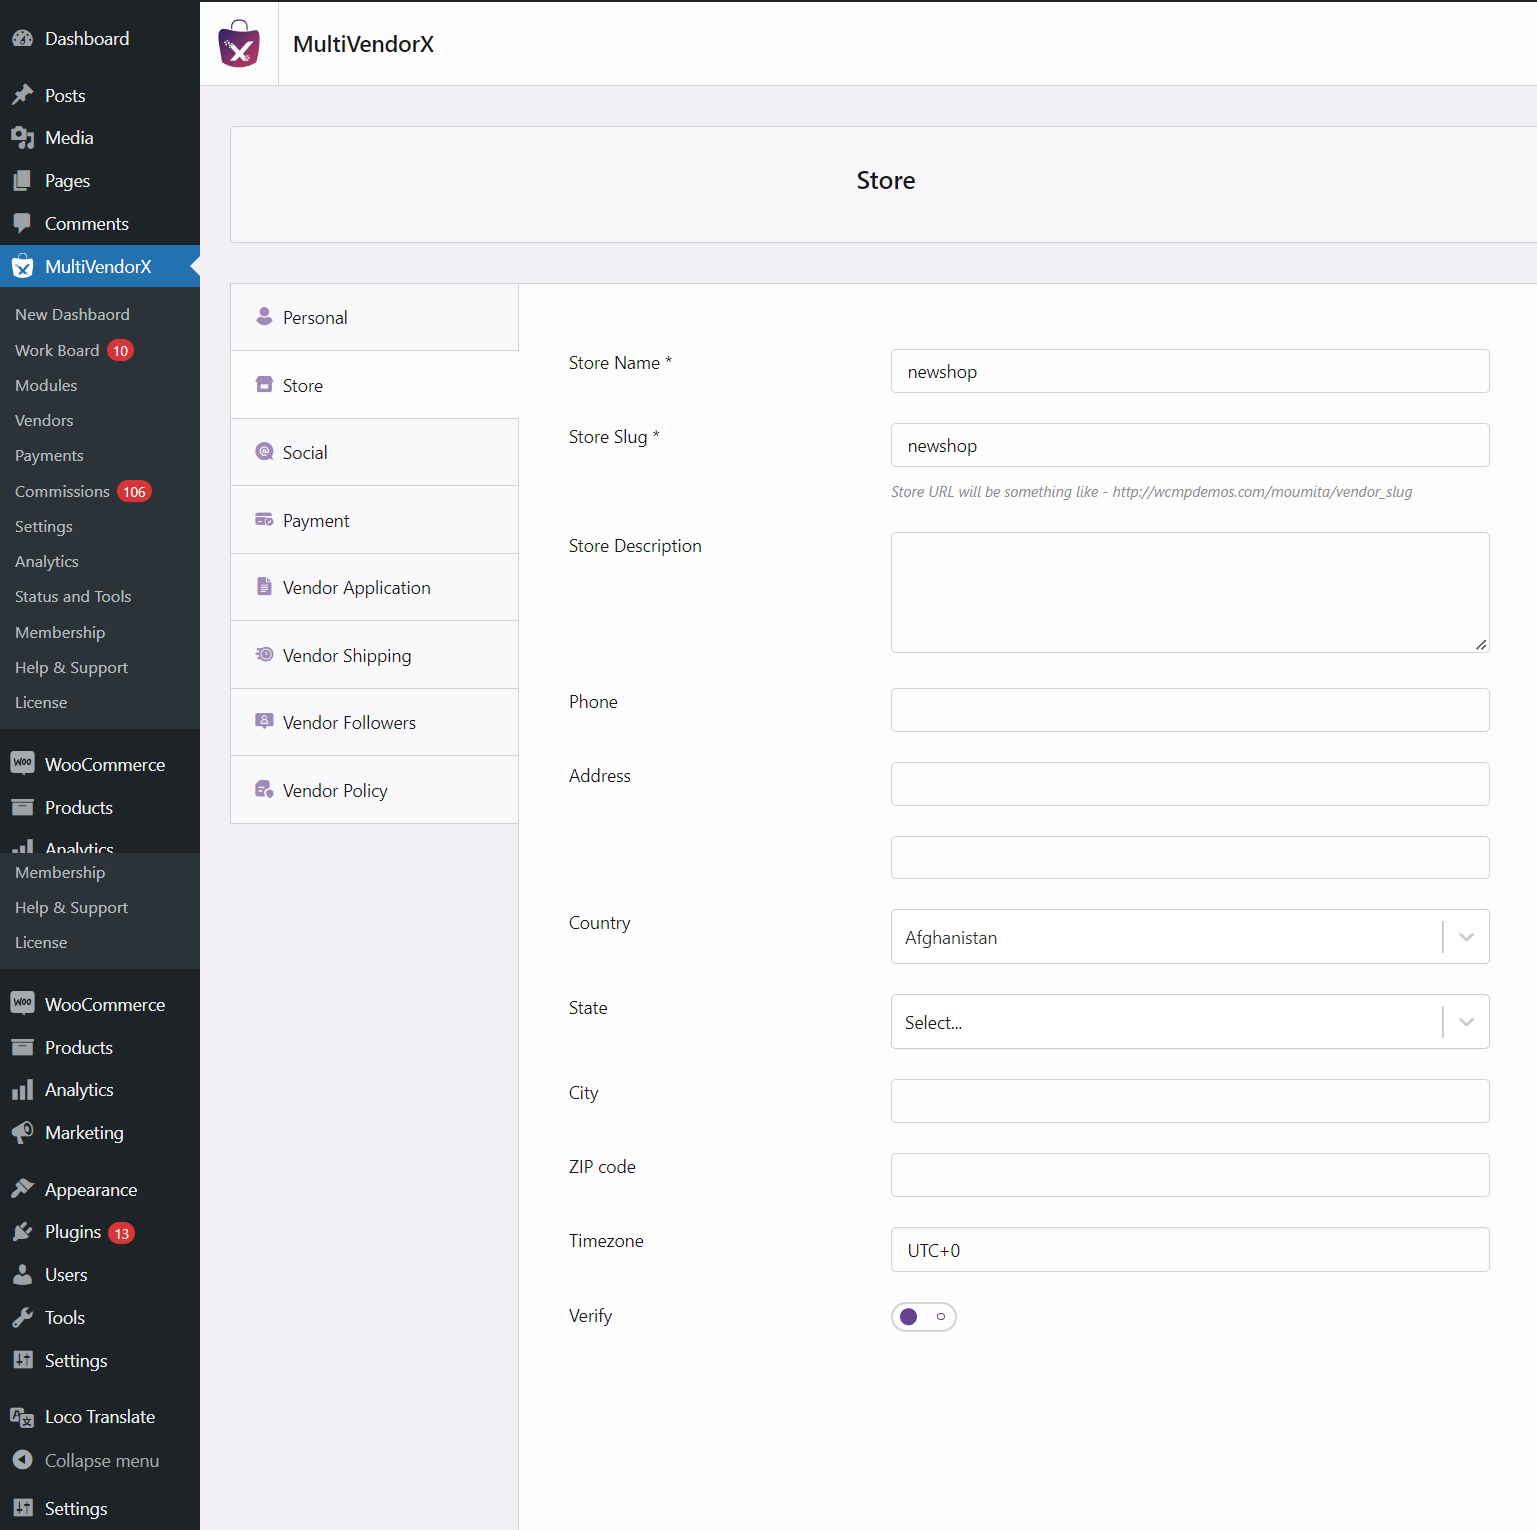
- Store Name: The name of the vendor’s store is written in this field
- Store Slug: The store slug is a part of a URL which identifies a particular page on a website in a form readable by users. For example, https://wcmarketplace.com/admin/vendor_slug
- Store Description: Here vendors can add the additional information about their shop.
- Phone: The number through which the customers would be able to reach the vendor
- Address: The location where the vendor store is located
- Country: The nation in which the shop is located
- State: The state in which the vendor shop is located
- City: The city in which the vendor shop is located
- Timezone: The time zone followed by the vendor store.
- Verify – This option only appears if the verification module is enabled. If the information provided by the vendor is correct enable this option.
Social Information #
Here you can view the social media platforms and addresses used by the vendor. These social media platforms include Facebook, Twitter, LinkedIn, Google Plus, YouTube and Instagram.

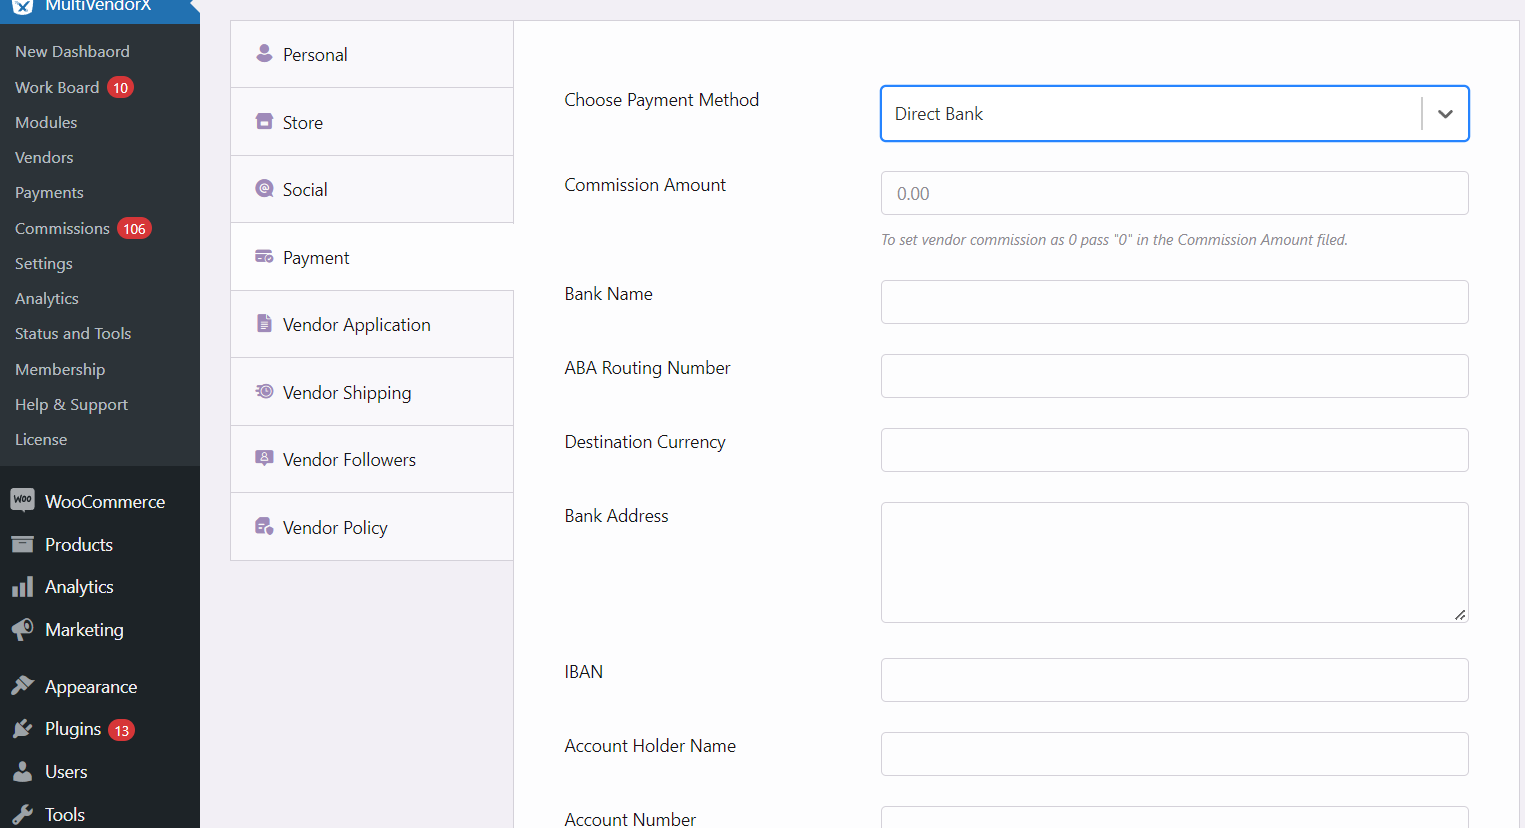
Payment Information #
This section lets you view and manage the vendor’s payment, on behalf of the vendor. You can view details like the method of payment chosen by the vendor to receive his payment.
You can also set the vendor-wise commission for the vendor here.
Vendor Application Information #
In this section, a vendor’s basic information like name, store description, country, and state is stored. This information can also be used for bookkeeping and reference purposes when tracking vendors.
Vendor Vacation #
This tab only appears if the Vacation module is enabled. By selecting this tab you can view the information provided by vendors when they are away on vacation. The information available includes –
- Calendar – Showcases the dates the vendor would be away.
- Avoid Purchase – If this option is enabled the vendor would not be accepting any orders.
- Avoid Purchase Notification – Displays the message the vendor would give to the customer about why he/she would not be accepting any orders.
- “Add to Cart” Button – Lets vendors change the content of the button from ‘add to cart’ to something they desire.
- Notification Message – The message here notifies the customer about the vendor’s absence.

Vendor Shipping Information #
The shipping tab lets you view and manage shipping information set by the vendor. However, before you edit or view vendor shipping you will need to select the shipping option by clicking on the search bar. The shipping option available are :
- Shipping by Zone – Vendors choosing this shipping option would only ship products to zones added by you. Shipping cost under this option only charges customers the flat Rate charges added by the vendor. To learn more about this form of shipping read this document.
- Shipping by Distance – If this is the shipping option selected, the shipping cost would be calculated on the basis of the distance added by the vendor. To learn more about Shipping by Distance read this document.
- Shipping by Country – When a vendor wants to ship their products to other countries, the shipping cost is calculated using the price that is allowed by that country. To learn more about this read this document carefully.
By choosing from the options given above you can help your vendor configure their own shipping.

Vendors Policies: #
You can view the vendor policies from the admin dashboard and can edit any changes if you want. to by going through the following steps

Vendor Followers #
Admin can also view the vendor followers from admin dashboard by going to Vendors section under MultivendorX and navigating to Vendor Followers.


