


Brief Introduction #
Eager to get started? So are we. You can set up your marketplace with MultiVendorX in less than five minutes with our very helpful MultiVendorX Admin Setup Wizard. Or, you can configure more advanced features by going to MultiVendorX settings submenu. So without further ado let’s get started on the setup process.

MultiVendorX Admin Setup Wizard Guide #
The setup wizard helps you configure the basic structure of your marketplace in just a few steps. It guides you through the most important decisions, such as how stores operate, how commissions work, and how store registrations are handled.
You can complete this setup in a few minutes. These settings can also be changed later from the admin settings if needed.
Manually Configure Admin Setup Wizard #
- Step 1. Choose your marketplace structure – In the first step, you define the overall structure of your marketplace and how stores will create and sell listings. What kind of marketplace you are building , this option helps configure the platform based on the type of marketplace you want to run.
- General marketplace – This is the most common setup where multiple stores sell their own products or services independently on your marketplace.
- Example: An online marketplace where different vendors sell clothes, electronics, or handmade items.
- Product marketplace – A marketplace where stores sell physical or digital products.
- Example: Electronics marketplace
- Fashion marketplace
- Handmade goods marketplace
- Rental marketplace – A marketplace where stores rent products instead of selling them.
- Example: Car rental marketplace
- Equipment rental marketplace
- Vacation property rentals
- Auction marketplace – A marketplace where products are sold through bidding.
- Example: Collectibles auction marketplace
- Art auctions
- Used item auctions
- Subscription marketplace – A marketplace where stores sell products or services on a recurring subscription basis.
- Example: Monthly subscription boxes
- SaaS tools marketplace
- Membership-based services
- Service marketplace – A marketplace where stores offer services instead of physical products.
- Example: Freelance services marketplace
- Home repair services marketplace
- Consulting services marketplace
- General marketplace – This is the most common setup where multiple stores sell their own products or services independently on your marketplace.
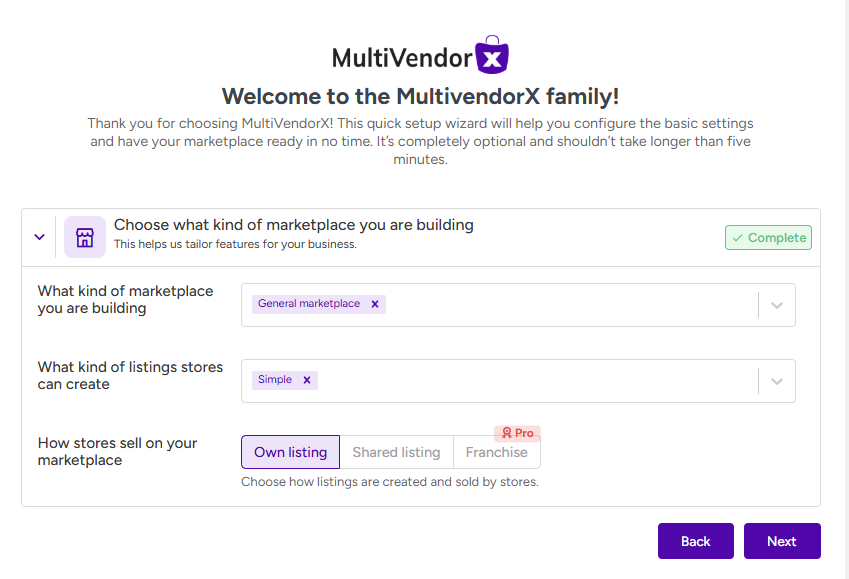
Step 2 : How stores sell on your marketplace #
Choose how listings are owned and sold by stores. This controls whether a listing belongs to one store or can be sold by multiple stores.
- Individual listings – Each store creates and sells its own listings independently. Only the store that created the listing can manage and sell it.
- Best for: Most product marketplaces
- Handmade marketplaces
- Service marketplaces
- Small vendor communities
- Example: A clothing vendor uploads a shirt and only that vendor sells the item.
- Shared listings – Multiple stores can sell the same listing. A single listing can appear under several stores, and each store manages its own pricing, inventory, or fulfillment.
- Best for: Wholesale marketplaces
- Brand product marketplaces
- Multi-seller product catalogs
- Example: A smartphone model is listed once, but multiple stores can sell the same product. Customers can choose which store they want to buy from.
- Franchise model (Pro) – Listings are managed centrally but sold by multiple stores operating under a shared brand or system. Stores act as regional sellers or franchise partners.
- Best for: Franchise businesses
- Regional distribution networks
- Brand-controlled marketplaces
- Example: A restaurant brand allows franchise partners in different cities to sell the same menu items.

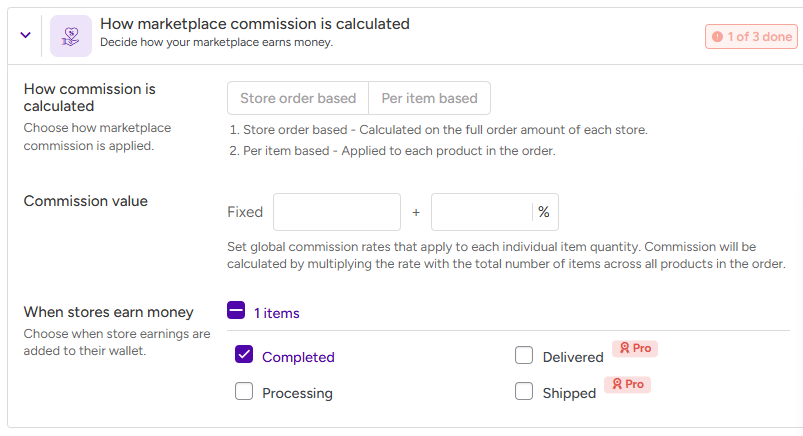
Step 3. Commission and store earnings #
How commission is calculated – Choose how commission is applied to store orders.
- Store order based – Commission is calculated on the total order amount for each store.
- Per item based – Commission is calculated for each product in the order.
Commission value : #
Set the commission rate applied across the marketplace.
- Fixed – A fixed amount is charged as commission per item.
- Percentage (%) – A percentage of the sale price is taken as commission.
When stores earn money #
Choose when store earnings are added to the store wallet.
- Completed – Earnings are added when the order is marked as completed.
- Delivered – Earnings are added when the order is delivered to the customer.
- Processing (Pro) – Earnings are added when the order enters processing status.
- Shipped (Pro) – Earnings are added when the order is shipped.
Step 4. Advanced commission setup #
Click Setup to configure advanced commission rules and payout behavior.
From the advanced commission settings page, you can:
- Create store-specific commission rules
- Configure different commission rates
- Customize payout behavior
- Adjust earnings conditions
These settings give you greater control over how revenue is shared between the marketplace and stores.

If the setup wizard does not appear #
If you reinstall the plugin, the automatic admin setup wizard may not appear during activation. In that case, you can manually open it from the admin panel.
Follow these steps:
- Go to MultiVendorX → Status & Tools in the admin menu.
- Open the Setup Wizdget tab.
- Launch the wizard and complete the required configuration.

We hope this document was helpful in understanding the setup wizard. In case of any difficulties, our quick support will definitely help you in the right direction… that’s a word you can trust.


