Brief Introduction #
As a marketplace administrator, you can choose to charge a transaction fee from each paid transaction in your marketplace. This ‘transaction fee’ is known also as commission. It benefits both the parties as vendors can generate more income by selling their products on a website with more profit while admin can keep the site running from the income generated through commissions paid by the vendor. Keeping this picture in mind MVX offers a commission module which is dynamic, flexible and caters to the needs of both admin and vendors.
Configuring MVX Commission #
As commissions are the lifeblood of a marketplace having a sound commission system is mandatory. WCMp commission system is easy to set, configure and manage.
In order to configure commissions
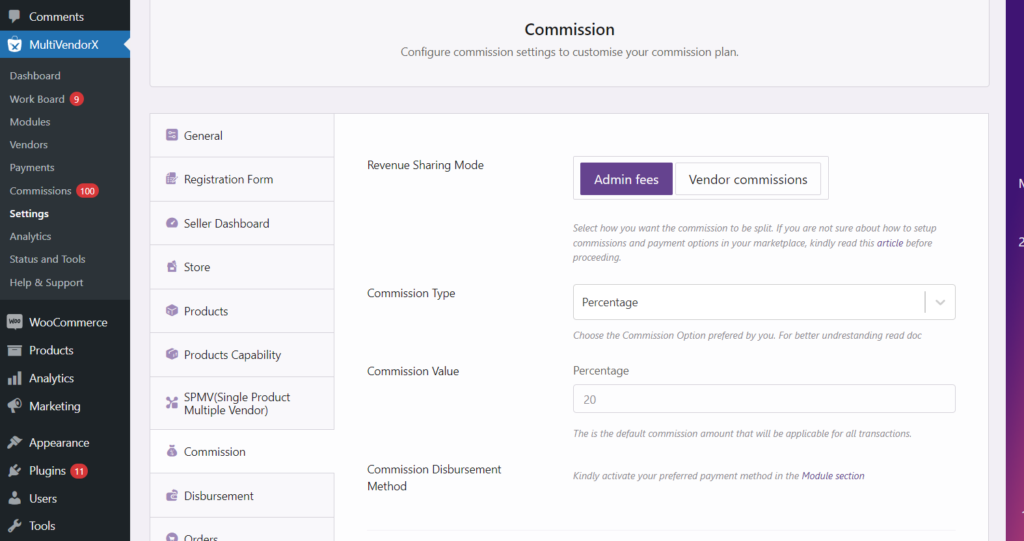
- Go to the Admin Dashboard and hover over the MVX menu, then select Settings from the MVX menu list
- Once the Setting page opens go to the Commissions tab
- Under the Commissions Tab are the various settings given that will help you configure you commissions
Revenue Sharing Mode #
The revenue sharing mode helps you decide how the commission would be divided between you and your vendor. The options provided by MVX are Admin fees and Vendor Commission.
Admin Fee : In case you have chosen this option when the admin receives payment he/she will deduct a portion of the vendor’s payment as the Admin fee and send the rest of it to the vendor.
Vendor’s Commission : In the case this option is selected, the vendor would receive his share of commission from the product sale payment and leave the rest of it to the admin.
#
Setting up Different Levels of Commission #
Levels of Commission #
Now that you have learnt how to set up commissions, the following section will help you learn about the various levels in a commission structure and how to configure them.
- Product-wise Commission
- Category-wise Commission
- Vendor-wise Commission
- Global Commission
Let us read the different levels of products and how to set them up
Product Wise Commissions #
The product-wise commission is the first layer of the commission structure. Here the admin can charge a commission fee from the vendor for the sale of each product.
Setting Up product wise commission #
In order to set up a product-wise commission for your marketplace follow the given steps
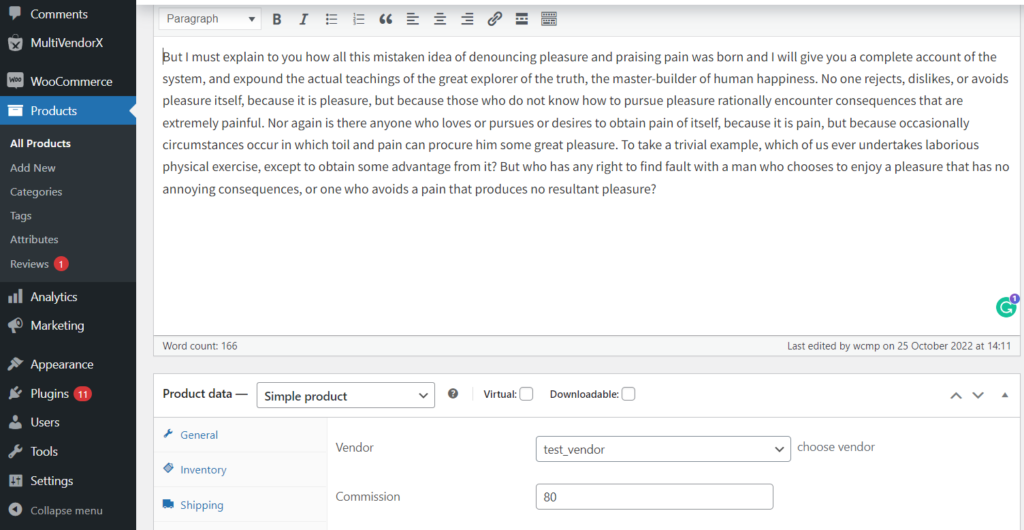
- Go to the Admin Dashboard and select the Products menu option. Once the product page loads, choose the product on which you want to add a commission.
- ·Once the page containing product details opens, navigate to the data meta box and select the vendor’s tab
- Select the name of the vendor selling the product and add the commission’s amount in the empty commission field
- Now every time the product is sold you as the admin will gain the commission fee added by you in the product commission field
Category Wise Commission #
The category wise commission is the second layer of the commission structure. Here the admin can charge a commission on the sale of each category of product.
Setting up Category Wise Commission #
In order to set up a commission on the categories of products being sold on your multi vendor site read the following directions carefully
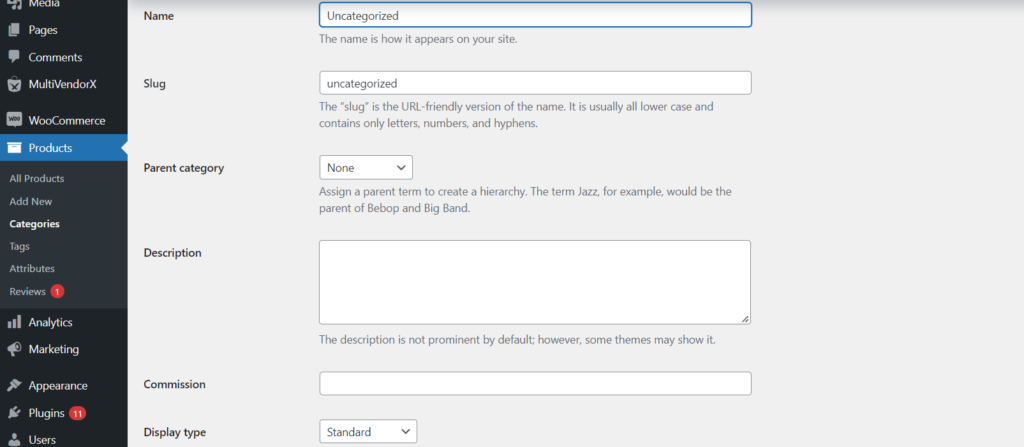
- Go to the Admin dashboard and from there navigate to categories submenu found under the Product menu
- Once the categories page loads you can add a new category and then add a commission amount or you can edit an existing category
- If you have chosen add a category you fill in the category details like name, parent/child, slug, description and finally commission
- Once the details are added by you select the add new category option. This will create a category with a commission amount
- Alternatively, you can also choose to edit a category but hovering your mouse on the category of your choice and then select edit
- Once the category page loads, go to the commission field and then select the commission amount
- Once the commission amount is added, select update
Now you can charge a commission on each product category
Vendor Wise Commission #
The vendor wise commission is the third layer of the commission structure. Here you can charge different commissions from different vendors.
Setting up vendor wise commission #
By following the given steps you can charge different vendors different types of commission rates depending on their capabilities
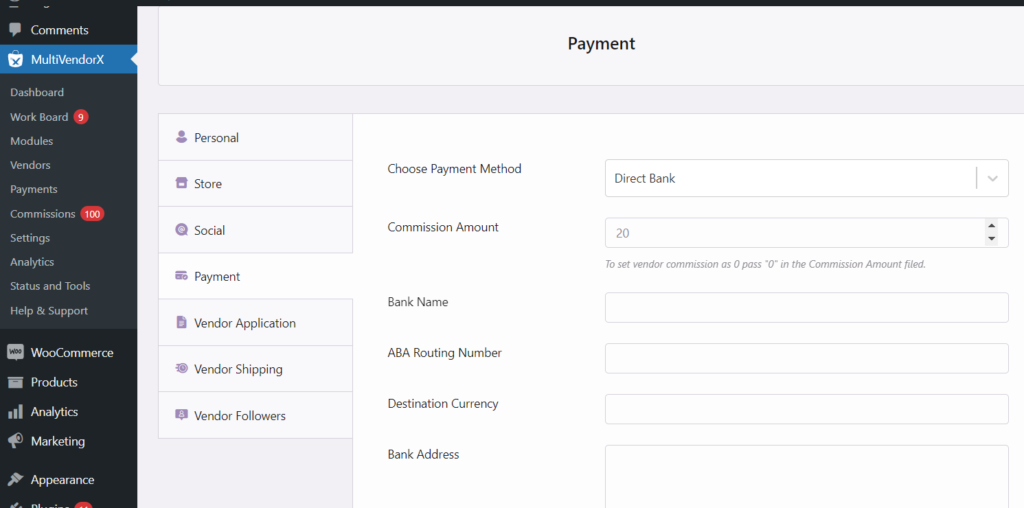
- Go to the admin dashboard and select MVX menu, from there select the Vendors submenu
- Click on the vendor which you want to edit from Seller Listing.
- At the Payment tab, you will find the Seller Commission percentage section.
- Put in the amount of commission you want to set up for this vendor.
- Finally, select save changes
Global Commission #
The global commission is the final layer of commission in the commission structure. Here the commission amount set by you would be applicable in case the commission amount for the other layers of commission is not set. In other words, the global commission is the commission that would be uniform and applicable to all.
Setting up Global Commission #
- As stated above the global commission amount is the default commission amount that would be charge in case the other levels or layers of commission amount are not set. To set a global commission
- Go to Admin dashboard from there navigate to MVX setting submenu
- Once the setting page loads go the Commissions tab
- Under What to pay section, you will find a commission field.
- Add the global commission amount.
View and Managing Commissions #
Once the product on your website starts selling commissions would automatically start adding. To view or keep track of commissions:
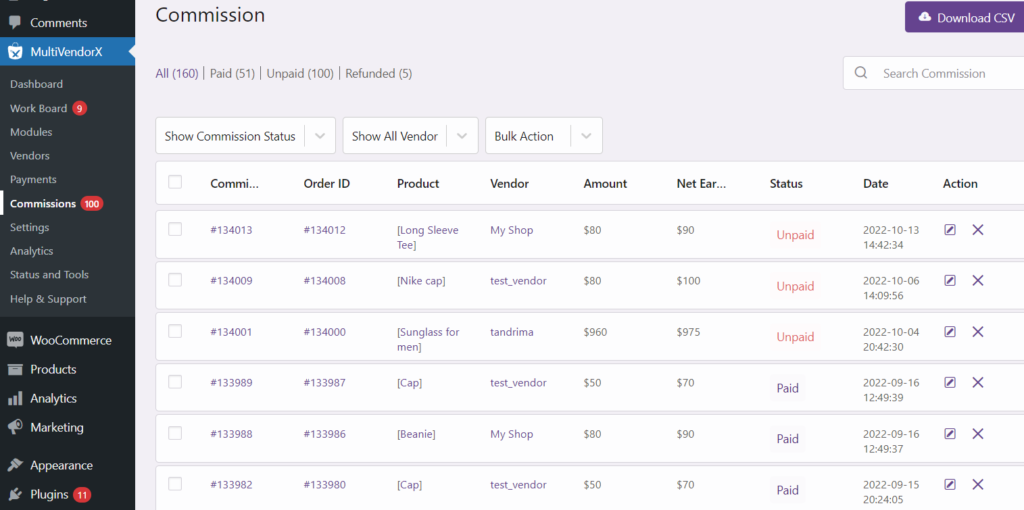
- Go to the admin dashboard and hover over MVX menu, from there select Commission submenu
- Once the commission page loads, you will be able to view
- Title: The commission title is displayed here
- Order Id: The order id on which you will receive commissions is given
- Product: The order id on which you will receive commissions is given
- Vendor: The name of the vendor who will receive the commission is displayed
- Amount: The amount is given
- Net Earnings: Your net earnings from the sale of this product is given
- Status: the commission status is displayed here like whether it is paid or unpaid
- Date: The date on which the commission is received is given
Admin can also manage commission by selecting a particular commission and choosing the edit option. Once selected the following details will appear.
Vendors Commissions #
Once the payment process is completed (details discussed in this document) vendors receive their commission amount on their dashboard. Depending on the payment method selected by them they can either request a commission withdrawal or wait for automatic disbursements.. Meanwhile vendors can view details of commission by going to :
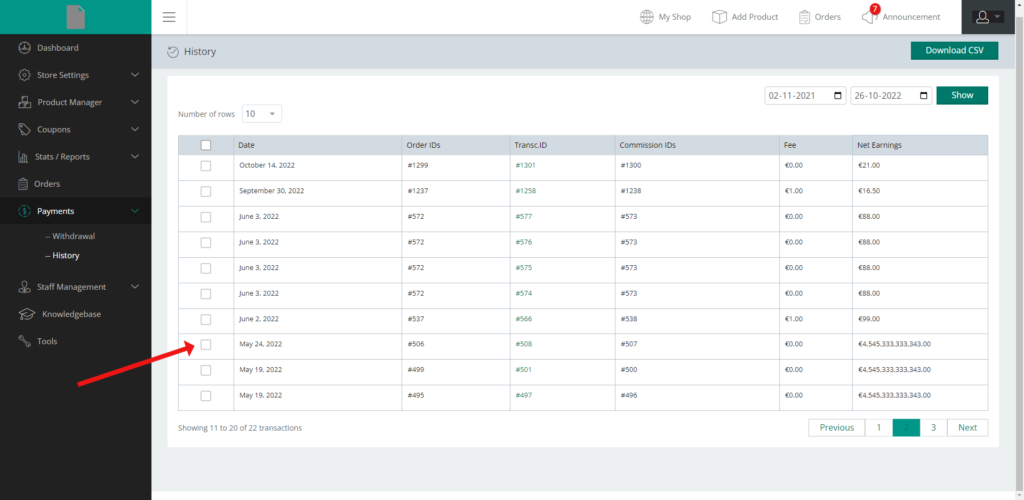
- Vendors dashboard and then navigating to Payments menu option
- Under the Payment menu the History Submenu would appear
- On the History page vendors can view
- Date – The day on which the vendor received his payment
- Order Id – This is the identification number of the order on which the vendor received his commission
- Transaction Id – Vendor can use this identification number to view the transaction details of the commission he has received from the admin
- Commission Id – This is the identification number by which a vendor can track his commission
- Fee – Here the vendor can view the amount charged for requesting a withdrawal after he runs of free withdrawal requests
- Net Earnings – This is the total amount he has earned after completing an order request
Commission Process Explained #
Here is a brief explanation of the commission process that takes place.
- Step 1 – The admin will configure commission details like, commission type or level, revenue mode and commission calculation type
- Step 2 – Customer purchases Product A for $100.
- Step 3 – Admin will receive $100 which would be reflected under Commission submenu option found under WCMp menu option.
- Step 4 – Now that the admin has seen his net earning commission he will proceed with paying his vendors their commission
- Step 5– The payment process is manual which means the admin will use the payment method chosen by both him and the vendors to pay them
- Step 6 – once the vendor receive their payment you would be able to view it under Payments option found on the vendor dashboard.
- Step 7 – He can now withdraw the payment from his physical account.
With this we come to an end of the commission lesson. Hopefully we were of some help to you. For further questions and queries please contact our Support Team.



Leave a Reply
You must be logged in to post a comment.