


Brief Introduction #
The WooCommerce Table Rate Shipping integration with MultiVendorX enhances your marketplace’s shipping capabilities by enabling flexible, rule-based shipping configurations. With this integration, the admin can define shipping rates based on key factors such as product price, weight, and item count. This allows for more accurate and dynamic shipping calculations, ensuring better control over delivery costs and an improved experience for both store owners and customers.
Requirements #
Overview #
Set shipping rules based on
- Price
- Weight
- Item count.
A little about WooCommerce Table Rate shipping #
WooCommerce table rate shipping is a wordpress plugin that lets you set different shipping rules based on different criteria. You can define multiple rates based on the product’s destination, have multiple rates per zone, and add rules based on product weight, the number of items, shipping class, and price.
What does WooCommerce Table rate shipping do to your multi vendor site ? #
When a customer checks out items in their cart, the plugin looks at the destination of items and then uses the table of rates you created to calculate total shipping. Each destination can have its own rules, or multiple sets of rules, based on your shipping requirements.
To know more about this plugin read here : Table Rate Shipping – WooCommerce Docs
Configuration From the Admin Dashboard #
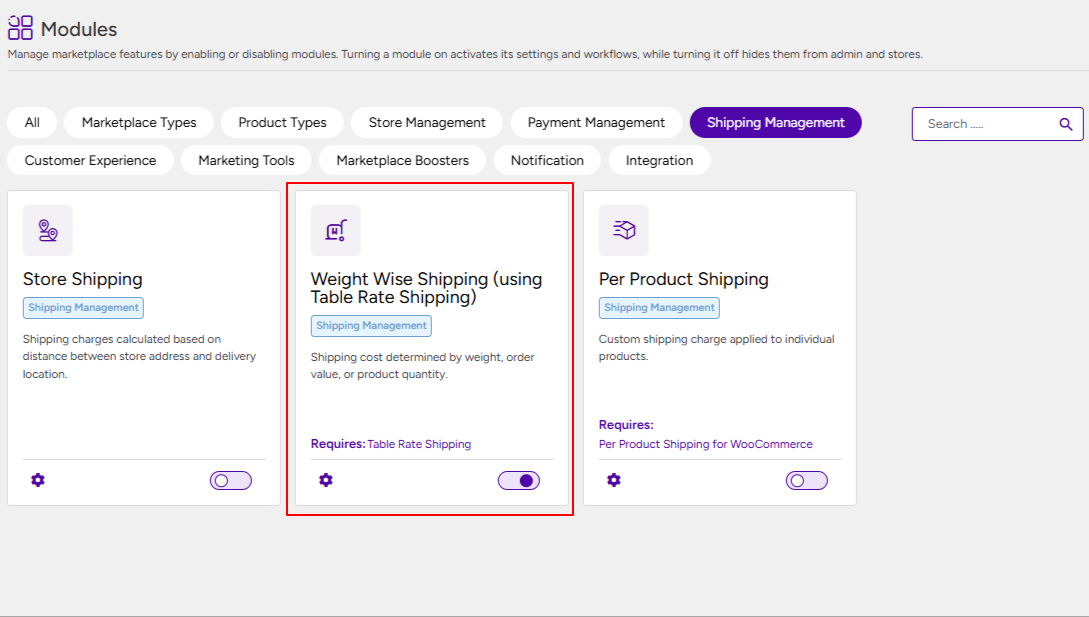
Once all the required plugins are installed and activated, follow the steps below to enable the Weight Wise Shipping module:
- Navigate to MultiVendorX from the WordPress dashboard.
- Click on Modules from the submenu.
- Locate the Shipping Management section.
- Find the Weight Wise Shipping module.
- Toggle the module to Enable it.
Configuration of Woocommerce Table Rate From Admin’s end:
- Admin has to go to shipping zones under the shipping tab of woocommerce settings.
- Select/add a new shipping zone then click on edit.
- Under the edit section of the shipping zone, click on the shipping method and enable table rate shipping.
- Once selected click on edit below table rate shipping.
- In the edit tab you’ll find the following options:
- Method Title-This is the title that which user sees during checkout.
- Tax Status-In this section choose the appropriate tax from the dropdown list
- Tax Included In Shipping cost-Select the appropriate option from the dropdown.
- Handling Fee– Admin can enter any amount they wish to. This option is allowed only once for the order as a whole.
- Maximum Shipping Cost-Maximum cost the customer will pay after all the shipping rules have been applied, if the shipping cost calculated is bigger than this value then this cost will be shown once.
- Rates- In this section admin will define their table rates which are applied to an order
- Calculation type- Admin can choose calculation type from the dropdown list.
- Handling fee per order- If the admin wants then they can provide a handling fee here.
- Minimum Cost Per Order-Admin can enter a required amount in this field.
- Maximum Cost per Order- The admin can enter a required amount in this field.
- Table Rates- In this field admin can enter as many table rates they want and also choose shipping class, condition,break,abort,Row cost,Item cost,kg cost, % cost,label.
- Class Priorities- The admin can select which shipping class they want to give the least priority and which they want to give maximum priority.
Configuration from the Store Dashboard #
Once the admin has enabled the Weight Wise Shipping module, store owners will have the option to configure table rate shipping from their dashboard.
To set this up, follow the steps below:
- Navigate to the Store Dashboard.
- Go to Settings.
- Click on the Shipping tab.
- Select Shipping by Zone.
- Click on Add Method for the present zones.
- From the available options, select Table Rate Shipping.
- Configure the table rates based on factors such as weight, price, or item count as per your requirements.
Once configured, the table rate shipping rules will be applied to the selected shipping zones accordingly.


